MetaChemistry's Training Incident: Mission Two
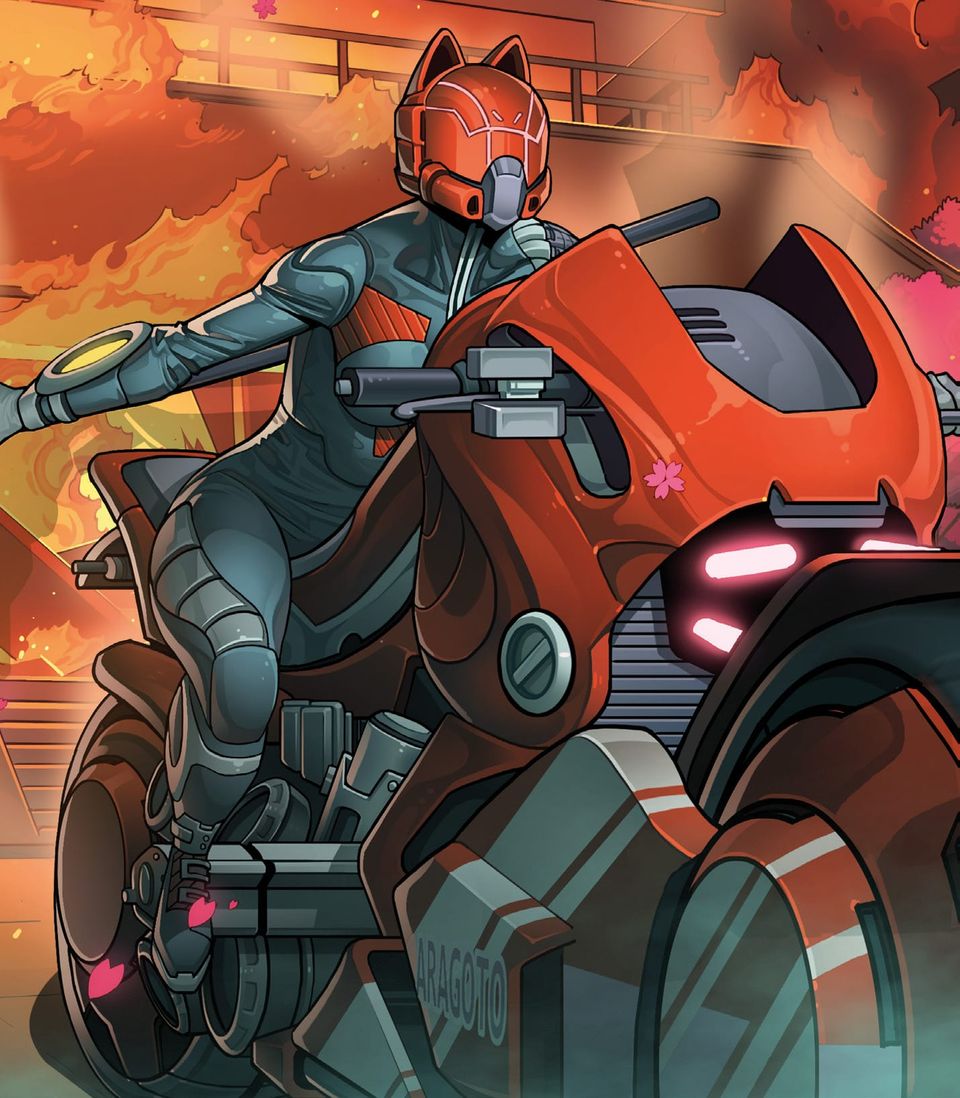
Today I bring you the tragedy of Contender Shikami, the Brave.
To catch up, I’m going to combine the planning and the report for the second mission in the local Escalation League, Close Quarters. To get the full mission packet, check out MetaChemistry’s Discord, but I’ll lay out the mission's basics here.
The Mission
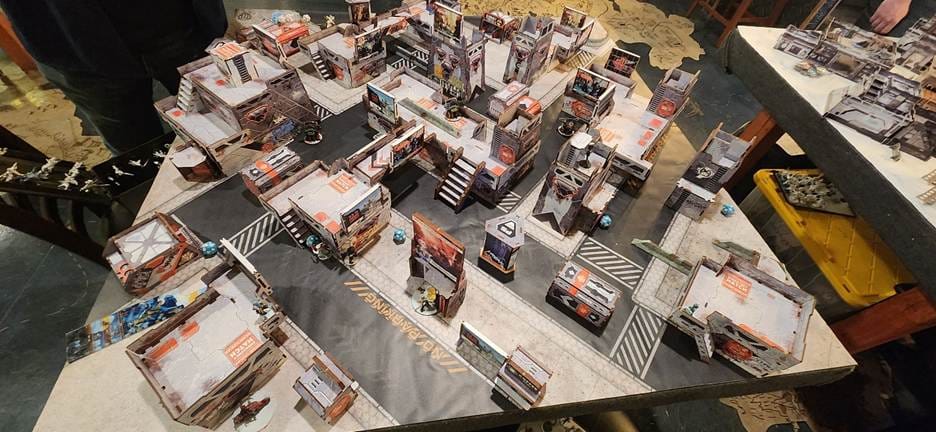
This mission is set at 200 points, and the restrictions on Fireteams and Command Tokens have been lifted. Like the rest of the missions, this one is also played on a 4’x4’.
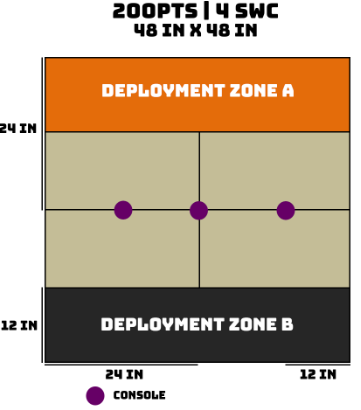
This is a quadrant-control mission, a la Superiority. At the end of each game round, you get 2 points if you dominate more quadrants, and 1 point for dominating the same number of quadrants (so long as both players dominate at least one). So for dominating quadrants, there are 6 possible points. There are three consoles along the midline and you get one point at the end of the game for each console you’ve activated, for 3 more points.
Finally, for the last point the bonus objective is Predator. Identical to the Classified Card, putting at least two enemy troopers into the Unconscious or Dead State by performing CC Attacks nets you the 10th point.
(For newer players, the quadrants are considered “Zones of Operations,” which are dominated by a player if they have more Victory Points in the area. Victory Points are equivalent to the cost of your units in list building, and only units represented by models or markers that are not in a Null State can contribute.)
As usual in scenarios like this, Troopers possessing the Shasvastii skill in a quadrant count for domination while in any non-Null State like the Shasvastii-Embryo State. And units with the Baggage equipment count for 20 Victory Points over their base cost for dominating the quadrant.
The consoles need a specialist to spend the usual Short Skill to activate, and the points for activating them are mutually exclusive. Operational Learning is still in effect for this mission, so if you fail the first roll and immediately try again, you get a +3 to the WIP roll, and if you fail the second time then you also get +1 SD to the roll.
Last thing to note is that the mission does apply the Retreat! rule.
Plotting
Fortunately, Oban has a bunch of high-cost units that can help dominate Zones. It also has very good martial artists for Predator.
The downside is that many of Oban’s very effective Zone-domination pieces are expensive. There’s not a whole lot of redundancy if your models start dying, so ideally you want some of the more resilient ones.
I felt that 200 points was a little limited to start bringing the O-Yoroi. Taking up 40% of your list to have good odds of dominating a single Zone doesn’t seem quite worth it. The Daiyokai and the Shikami, on the other hand, are both 30+ points cheaper and give decent odds of single-handedly dominating a Zone. Of the two, the Shikami is more deadly in CC (and more mobile to allow it to get to CC) for Predator, and it’s a specialist and can turn on the consoles.
Looking back to the last mission, the Karakuri is also a decent option for a resilient Zone-holder at 31-38 points, and they’re all Forward Observers as well if you want to push them to the halfway line to push the buttons.
In the 20-30 point range, there are a variety of possibilities.
Any of the named, non-Oniwaban, characters can be useful here. Neko Oyama is a decent chunk of points with good survivability, samurai-level CC, and some decent weapon options (utility-wise, at least). For a mission at this points level though, when we’re already likely taking a 40+ point option in the Shikami/Daiyokai, I think I would prefer taking something with more mobility to exploit opportunities in other parts of the board. The Kuroshi Rider is perfect for this. While not nearly as durable as a Heavy Infantry, she is exceptionally fast and can conceal her approach with built-in smoke.
The other two primary character options that I would tend to consider are Yuriko Oda and Mushashi. Yuriko is a good engineer with some nasty weapon options if someone tries to corner her and can help get your HI Samurai going again if something mobility-kills them. She’s definitely fragile with ARM 1 and 1 Vitality, though. Also: specialist! And if you’re feeling extremely ambitious(/reckless) you can take that Forward Deployment +8” to start her within a single short skill from one of the consoles, depending on terrain. Mushashi is a little more durable with Immunity (ARM), 1 Vitality, and No Wound Incapacitation, and is a decent chunk of points (an eighth of a list at this points level) for holding a Zone. And that WIP 15 Flash Pulse is intriguing, though you’re probably not going to use that as an opening attack most of the time. He intrigues me primarily as an excellent CC piece that is almost certain to pink-mist anything he manages to close with and that’s pure with Tanko. Tanko aren’t terribly expensive, and therefore likely to dominate a Zone all on their own, but there is the Disco Baller profile that JSA probably wants to take in most lists to prevent those pesky Multispectral Visors from foiling your charge before it starts. So there’s a good chance that Mushashi can find his way into many lists, in my opinion.
Next on the list of 20ish point character possibilities is one that, I admit, I didn’t consider. In hindsight I think that choice was dumb. Freelance Operator Samsa can easily start at the halfway point, or somewhere else that’s a little better concealed, and pop up at an opportune moment, and be an absolute, high-speed menace with his Plasma Rifle. If he has an unopposed path to a console, he can also act as a button pusher, but I think his primary role would be jumping 8” into an unexpected shooting position and murdering them. I think I made a mistake in overlooking him for this mission, even if it may not have changed much in the game.
Last on the list of characters in this points bracket is Yojimbo. Honestly, the motorized version could fulfill a similar role as the Kuroshi Rider, though it’s a little harder for him to outright dominate a Zone at only 20 points. His Crazykoalas though do a great job in helping to control whatever Zone he moves to, creating a defensive mine network that your opponent can have trouble eliminating if they didn’t bring the right tools to clear the field. He’s also good at CC and brings his own smoke!
Another interesting option that start in a Zone and give you a decent chunk of domination points is the Ryuken Killer Hacker. She gets that same 8” of Forward Deployment and is a specialist. She doesn’t start out in a marker state, unlike her Heavy Rocket Launcher companion, though which can make her deployment risky. The Decoy helps, but definitely isn’t as good as straight-up camouflage. Overall, I like her, but she may be match-up dependent.
Finally, I think we should look at the Skirmishers. Oban’s skirmishers are fascinating choices for a mission like this, especially if you can take second turn. While Ninjas probably don’t want to try to infiltrate past the halfway line, that’s easily a 24-33 point model that, unless your opponent brings Sensor, is going to be completely safe in one of your near Zones until you decide to reveal it. That can pretty easily shift who is scoring the Zone in a way that gives your opponent no recourse if you can afford to wait until the bottom of Round 3. The Specialist options also give you a way to secure the points for Consoles without your opponent getting much choice in the matter, even if you can’t technically deploy in Silhouette contact with the objectives. All you need to do is move the fraction of an inch to actually touch it and boop the button. I need to remember that they can Hidden Deploy prone (ideally in a nice corner where no one is likely to see them anyway) so that I can reduce the odds of opponents getting AROs against them even when they reveal.
The Oniwaban, however, can be relatively reliably infiltrated right up to your opponent’s DZ and can therefore give you surprise domination-swings in Zones your opponent might have thought were safe. Again, this works best if you can wait until Round 3, and the bottom of Round 3 is best. And it is still a risk to make that Infiltration roll. But it can be exceptionally potent when it works. And while I tend to use Ninjas more as hidden specialists to do objectives more than anything, despite being proficient at CC, Oniwaban aren’t specialists. So their only purpose is generally murder, with missions like this adding being 29-30 pretty safe points in a zone. The Oniwaban character Kistune amplifies both of these roles, being even better at murder with Martial Arts L5, Infiltrating on 16s instead of 15s, carrying her own smoke, and being 14-15 points more expensive than other Oniwaban.
Last, Saito Togan can do many of the same things as the Oniwaban, though I would treat his infiltration more like a standard Ninja’s: mostly don’t bother to go past the halfway line. Carrying his own smoke, like Kitsune, though is very handy, as is his T2 Boarding Shotgun.
The List
I started building a list for this mission while Round 1 of the League was still ongoing.
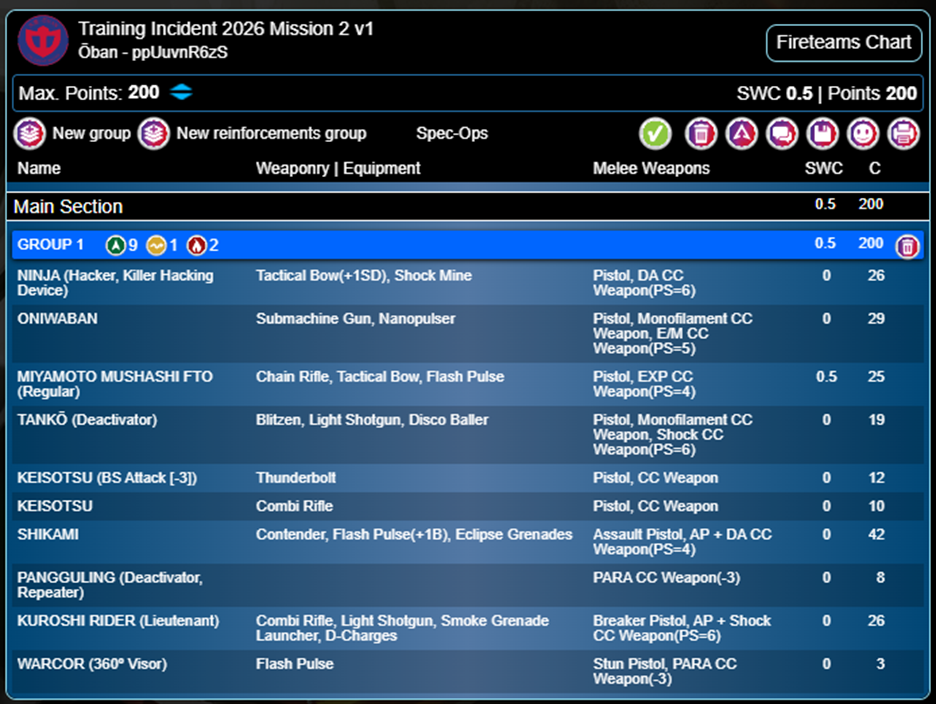
Despite not having any real long-range guns, I was feeling okay about it. The Tanko is relatively durable, and while its Blitzen isn’t lethal, it’s still something most models have to at least respect, and its AROs can still slow down an advance which can be critical when most people may only have a single combat group’s worth of orders. Mushashi to try to get that sweet, sweet, Martial Arts L5 AP+Explosive CC kill, but primarily to duo with the Tanko to improve his Disco Baller and Blitzen odds. I decided to go with the Shikami for the mobility, points value, and CC ability, and figured that it had decent odds to win gunfights with cover and Mimetism (-6). Last, I brought the Kuroshi Rider as a Lieutenant to take advantage of her WIP 14 and her bike’s speed. Basic Baggage Bot to reload the Tanko. I’ve been really enjoying having the Oniwaban to assassinate supporting elements in the backline, and the Ninja Killer Hacker has been a button-pushing champion in both the league and in practice games.
The Keisotsu were added to fill in points, and add one long-range gun that could bully a few pieces, though I really didn’t want to test that. With only 200 points, I wasn’t really comfortable with the Thunderbolt being an ARO piece, even if it likely wouldn’t be terrible at the job with a friend to add a Special Die.
Of course, all of this was before I knew what I might be facing for the round.
Pairing
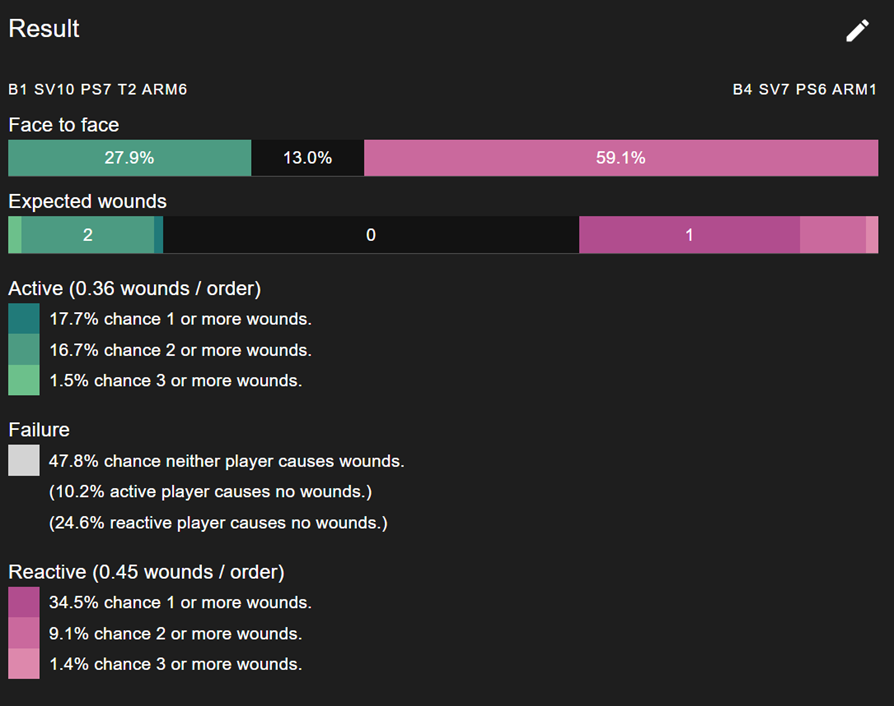
When Devin rolled the pairing for the round, I was matched up against Nolan, a newer player who had picked Shindenbutai for the league. It wasn’t until the day of our match that I realized that my reliance on CC for the mission would not fair terribly well against a Hatamoto. That Natural Born Warrior with its own Martial Arts L4 negates the advantages that most of my close combat specialists have in such a fight, if it doesn’t tilt the scales in the other direction entirely. Even Mushashi doesn’t really like that fight.
He does have about a 10% edge in the fight, but there’s still a 40% chance the fight does nothing, and a 20% chance he takes two wounds. In my opinion, those odds make for a backup plan, not a primary plan.
I think one of the best ways to deal with Hatamoto is to shoot them. A lot. And the higher damage, the better. Templates no longer bypass Nanoscreen, so unless they're very high damage and/or very high burst, I think I'd rather use a Spitfire or HMG. And Oban doesn't really have any templates like that anyway, which leaves one of the flavors of HMG or the couple of Spitfires.
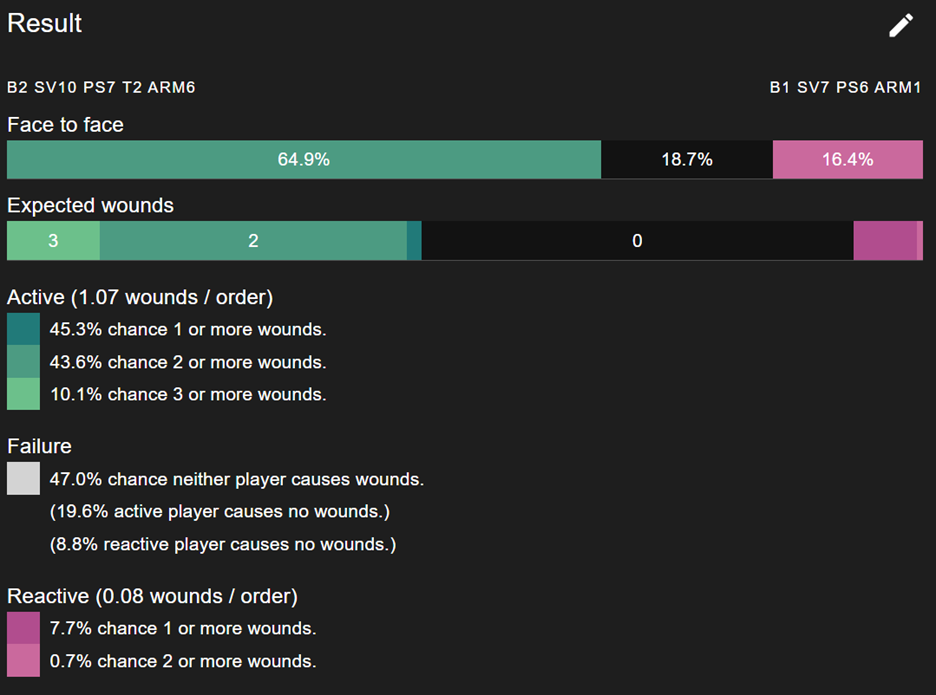
Alternatively, the CC fight looks much better if you can brick the Hatamoto with E/M first so that it can only reset on a 1 while you take swings. I'll talk more about the Karakuri elsewhere in this post, but the E/Mitter profile would be useful for that. Another nice option would be the Domaru's E/M Grenades, especially if you can get in a position for them to toss the grenades over the wall at the Hatamoto with a speculative fire shot and it can't shoot back or easily dodge into you before you brick it.
But by the time I realized that, it was far too late. Lists had been due the week before we were able to get our game in.
The Game
This description of the game might be much more brief than previous ones, if only because the game happened so long ago.
If I remember right, I think I went first.
Being newer, my opponent didn’t really bother with any fireteams, though there was a good option for a Bushi-tai duo with his Jizamurai and Spitfire Hatamoto. Other than that, he had Motorized Yojimbo off on the right hand side, a Tanuki hacker behind the Hatamoto, a Senku, a suspicious camo marker (Kyojin) close to the cosole on the right, a Flash Pulse Bot on the bridge in his DZ, and I would be subjected to a Raiden standing on top of the crate on the left side of his DZ. Otherwise, there was a Metsuke hiding in a sea of holoprojections under and around the bridge that the Robio Flash Pulse was standing on. And last, hanging out by Yojimbo, but out of the DZ, is a Paramedic Yamabushi.
I had the Warcor on the right side with a narrow line of sight to the Console to slow approaches to that objective, or at least slow movement between that one and the center Console. The Shikami went on the tall tower just outside of my DZ. The Baggage Bot’s (Pangguling played in this game by a Fuzzbot) position was kind of risky, but it was in a good position to reload the Tanko and take a couple of steps into the quadrant. Said Tanko and his buddy Mushashi were stationed at the corner of the building in front of the Pangguling. I hid the Kuroshi Rider in the back left corner where she would be relatively safe barring any aggressive pushes into my DZ that exposed an enemy model with one of her better ranges. And the Thunderbolt Keisotsu went on the roof looking out to the right to help protect the Pangguling, while the other Keisotsu was tucked away on the ground on the other side of the building, watching that corner to protect the Kuroshi Rider’s back.
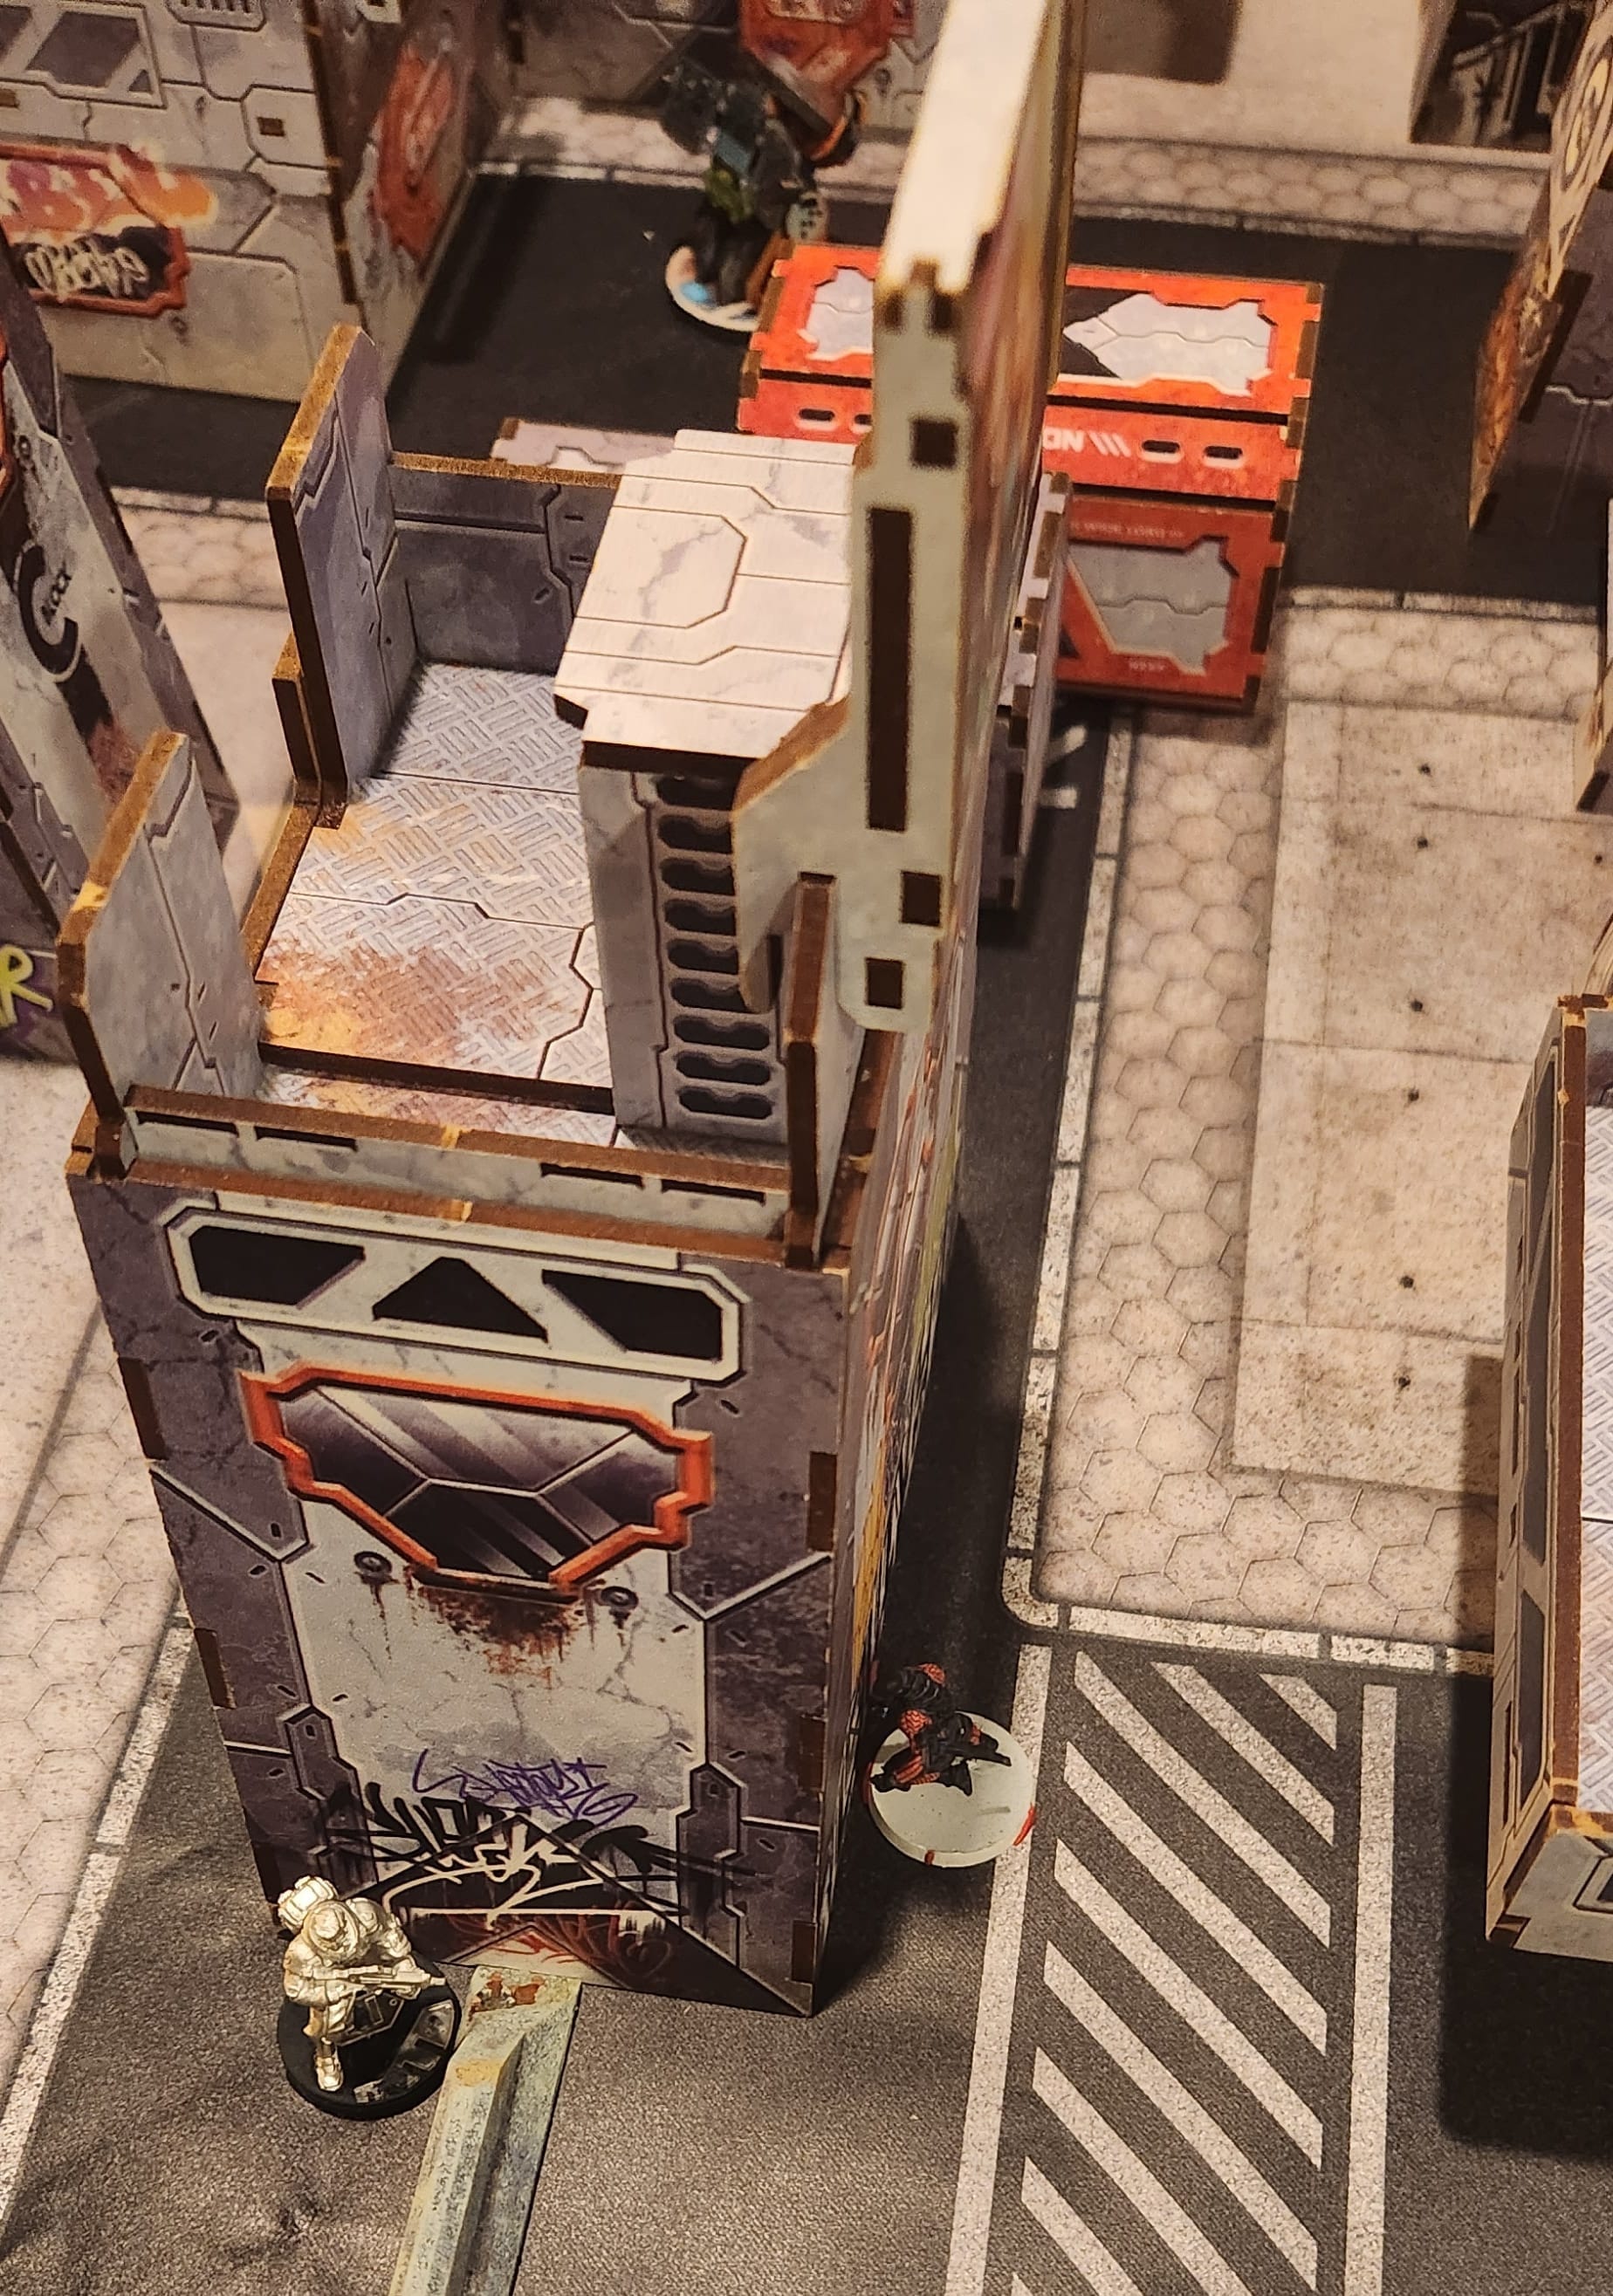
The Ninja was tucked up next to the left-most console, and the Oniwaban managed to sneak his way right up to Nolan’s DZ just around the corner from the Senku.
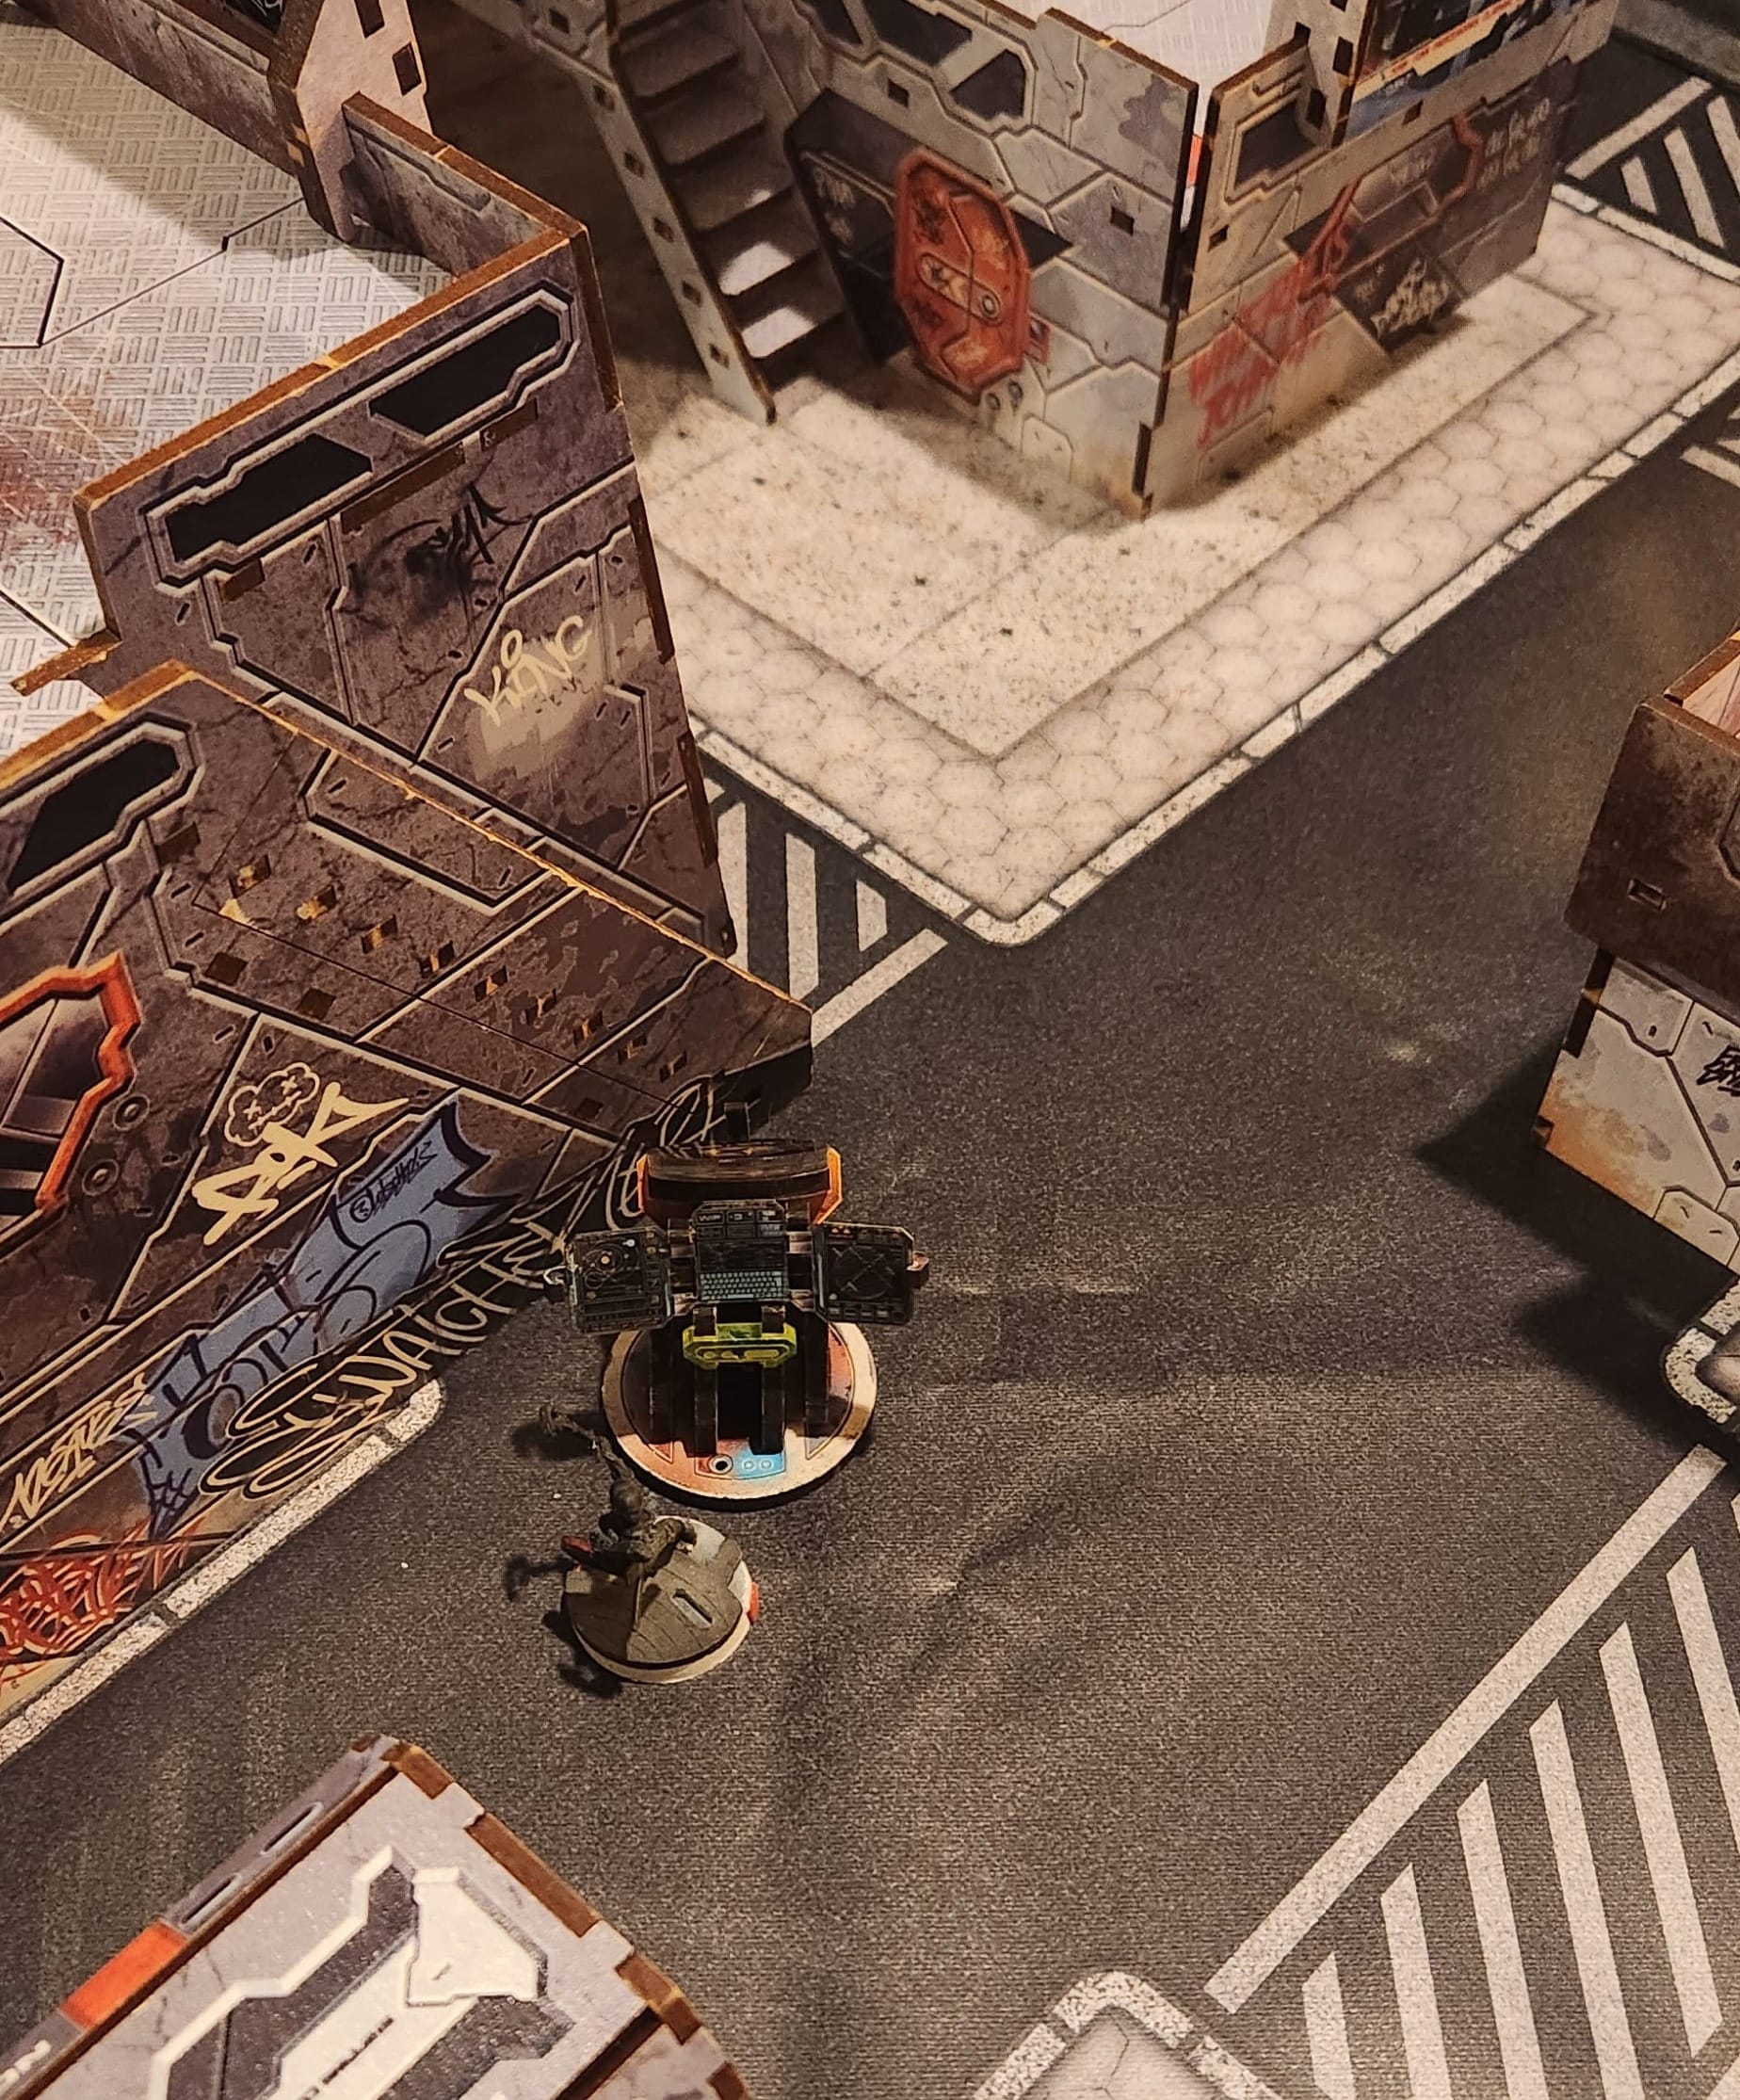
The Shikami dueled inconclusively with the Hatamoto and Jizamurai using her Contender before retreating down the backside of the tower so that she could get some more movement in future turns. Knowing me, there’s a good chance that I wasn’t paying close enough attention to her final position and she didn’t end up entirely in that near quadrant. Honestly, she probably could have stayed in that tower, possibly going prone, so that she could respond to enemies as they got closer to either the center or righthand consoles.
Otherwise, the Tanko and Mushashi moved around to fight the Flash Pulse Bot, and the Blitzen effectively knocked out the Remote for the rest of the game. Once that was accomplished, the two moved back around the building so that they’d be positioned to deal with the Hatamoto on the next turn if it tried moving forward.
On my opponent’s turn, he moved Yojimbo up pretty aggressively, though I don’t think he made any of his attempted smoke rolls. He did drop a koala between the right-most console and the building behind it, making it a pain to deal with. He then goes on to menace the Shikami, and when the odds on that become clearer, Nolan starts jumping the camouflaged Kyojin over to take potshots at the Shikami while her back is turned. He does manage to put a wound on it, but thankfully the Shikami survives its encounter and moves into a better spot to deal with the two of them.
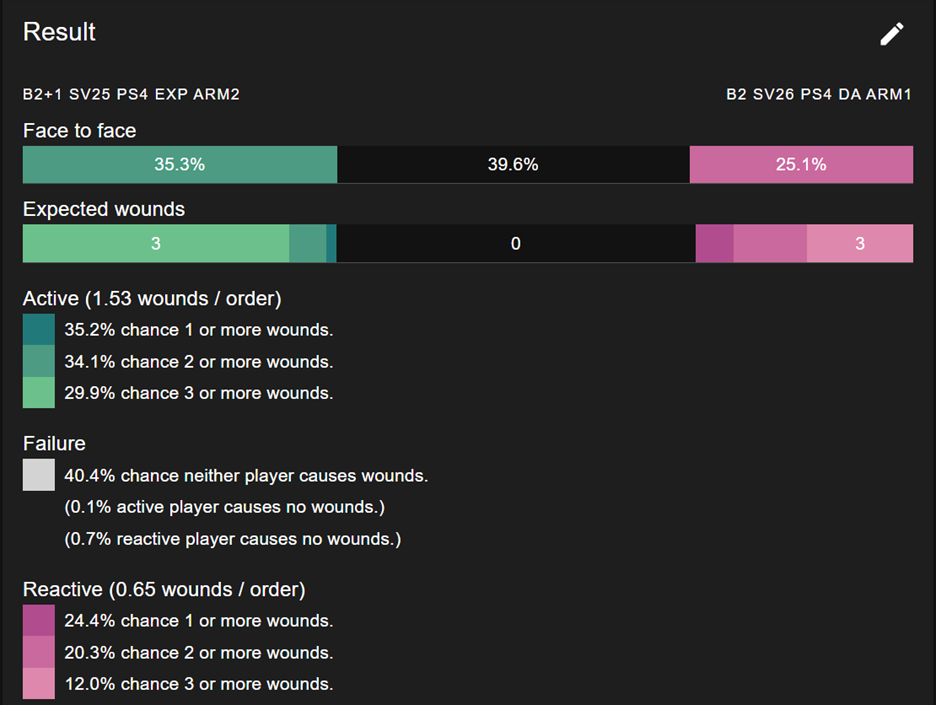
Over the course of the next couple turns, I do kill Yojimbo and (finally) the Kyojin, but I end up with the Shikami unconscious. Before that happens, the Shikami also takes a bunch more potshots at the Hatamoto, trying desperately to put him down before he can close to CC. She does win the majority of the fights, but Nolan rolls well enough that the Hatamoto never fails a single T2 save.
I guess even on the Hatamoto’s active turn, there’s almost an even chance of nobody taking any wounds. But I took a bunch of active-turn shots against the Hatamoto, and he should’ve at least gone unconscious.
I even risked a shot with the Keisotsu Thunderbolt from across the table to try to put even one wound on it. Great shot, also didn’t work. Alas, that’s what we get for playing a dice game.
Like I said, at some point, the Shikami takes her second wound, and the Hatamoto ends the second turn with the righthand and center consoles activated.
I try to move the Tanko and Mushashi over to counter the Hatamoto, and that’s when Nolan reveals the Raiden. He drops Mushashi in a shot, but the Tanko manages to survive on a wound and eventually is the one to deal with the Kyojin in CC. The Tanko immediately dies afterward as the Hatamoto puts him down.
At this point, I reveal the Oniwaban and start trying to eviscerate his backline. The Senku is no problem. The Jizamurai and the Tanuki take a little more luck and positioning, but I do eventually get both of them as well. Unfortunately, the Oniwaban isn’t able to get to the Metsuke, probably because something kills it (I think the Raiden through a pinhole gap under the bridge).
In round three, I feel I need to bring the Shikami back up to have a chance. Nolan won zones in Round 1, and we tied on Round 2 (I think), to bring it to 3-1 in his favor. He currently has two consoles as well, though I have definitely gotten Predator, for 5-2.
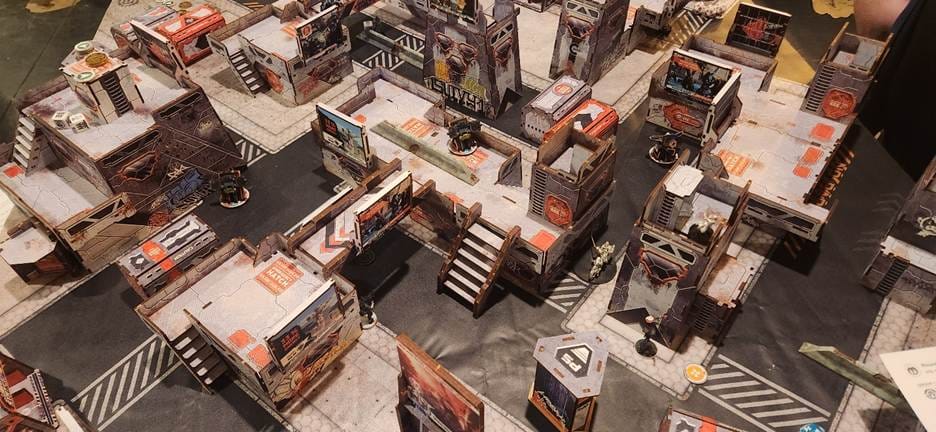
I land some speedballs along the path, and the Kuroshi Rider roars across streets and sidewalks, launching smoke to conceal herself, and brings the Shikami back to one wound, and then rockets past to get to the righthand console. She survives the koala and hits the button. On the other side of the table, the Ninja reveals and hits the other button, bringing me to 4. The Rider moves into Nolan’s near zone on that side. And then I’m out of orders, though I had hoped to get the Pangguling or the Keisotsu team up into my near zone on the left side, now that everything else there had died.
Looking at the table, the Hatamoto controls Nolan’s near quarter on his right. Nobody is in my near-left quadrant except possibly the Ninja, though there’s a very good chance that in my fear for her life I moved her over the halfway line and she’s either contesting the Hatamoto in Nolan’s near quadrant or she’s not contesting a quadrant at all.
The Shikami’s back in the quadrant she started in, and the Kuroshi Rider has Nolan’s near quadrant on that side. I’ve flipped two consoles to my control. Nolan hasn’t been able to score Predator yet.
If nothing else changes, that should bring the score to 6-4 in my favor.
So Nolan needs to deal with a couple things. He ignores the Ninja and instead takes his Hatamoto back over to the right side of the table to kill the Kuroshi Rider. The Hatamoto does put her down, though I think she’s the one to finally put a single wound on the samurai with her shotgun and it takes the Hatamoto two or three tries to finally kill her. The Yamabushi might take a shot at her as well, because I seem to remember her having to go Dogged. Then the Hatamoto comes back into my near quadrant to kill the Shikami.
Final score: 7:3.
Post-game
This one was brutal. I had the chance to reconsider my list to put some real ranged guns in it to deal with the Hatamoto, and foolishly ignored it. I really liked the Shikami in that game, even I didn’t take full advantage of her mobility, but after the fact I was regretting not at least considering taking the Daiyokai instead. That HMG profile is pretty sweet, though even the MULTI Marksman Rifle likely would have been an improvement over the Shikami’s Contender.
Thinking of other alternatives, a Lu Duan might have also been good to get higher-burst weapons on the table and it comes with enough MSV to negate the Hatamoto’s mimetism. I’ve primarily played with the Thunderbolt and E/M Carbine variant in my time with Invincible Army, but looking at the unit again, that Burst 4 Mk12 is real neat.
Otherwise, an E/Mitter Karakuri (or even just finding a way to Blitzen the Hatamoto with the Tanko) could have bricked the Hatamoto long enough to close. Or making it eat a Heavy Rocket from a Ryuken might have done the trick.
I also made some mistakes in my movements. If I had been more cautious with the Tanko duo, they likely could have been even more impactful to the game. Taking a single half-order to put out another Disco Ball in the path of their advance, just to be safe, could have helped the team close with the Kyojin and the Hatamoto while the two were on that central building where the middle console resided. I had been bringing them over there anyway, and I still had a decent number of orders on that round. Just laziness on my part, since I knew there was something Hidden Deployed on Nolan’s side of the table. I think in the moment, I had forgotten about the Raiden and assumed it was some flavor of Ninja, likely a Kurayami. Rookie mistake.
I think the Shikami was also a little isolated off to the right, and I relied on her own stats a little too much to fend off any attacks. The Warcor was put down by early in Nolan’s first turn, and hardly anyone else could see the Shikami to support her in the defense.
I also ended her last movement facing back toward my DZ, instead of licking the wall so that she could see anything trying to come up over it. Definitely a case of only thinking in two-dimensions, assuming that the only threats would be something like Yojimbo coming around the tower, instead of something flying over it. That kind of thing is definitely one of the reasons I haven’t gotten nearly as much use out of skills like Climbing Plus and Super-Jump with other factions I’ve played. I’ll add that to the list of areas to improve in.
Overall, I think I might have made the game harder on myself with the list I played, but it was by no means a foregone conclusion. As usual, a couple small decisions could have drastically altered the game. In this case, I’d estimate that facing-issue with the Shikami and not being careful enough with the Tanko duo were my top mistakes.
But I did really enjoy the Shikami’s gameplay. That Mimetism on a Heavy Infantry does a great job at turning her into a solid gunfighter, even if she might prefer to beat people over the head with her naginata.
End Transmission
As usual, if you’ve read this far, thank you!
Standard shilling:
If you’ve found this helpful, entertaining, you can follow and/or subscribe here directly or on Patreon (some construction is ongoing there). I’ve also set up a Ko-fi if you prefer to support these rambles that way, or just want to throw a couple bucks my way if I stumble upon something profound. I’m also open to accepting suggestions for things to talk about in the future, and will (generally) prioritize the topics that come from subscribers.