Tournament Plotting With SAA - Corporate Appropriation
There’s a local tournament coming up, so I thought I’d lay out my thoughts on list construction and some preparation for it. After the tournament, I want to go over how well my plans, assumptions, and thoughts held up. I’m sticking with Acon for the time being, so everything here will be through that lens. I’m definitely going to be drawing on the general advice and analysis for each mission from folks like MetaChemistry, Rob Shepherd, Dante, Loss of Lieutenant, and all the other fantastic Infinity content creators.
The missions for the tournament are Corporate Appropriations, Evacuation, and Superiority. Today, I’ll go through some thoughts about Corporate Appropriation.
The Mission
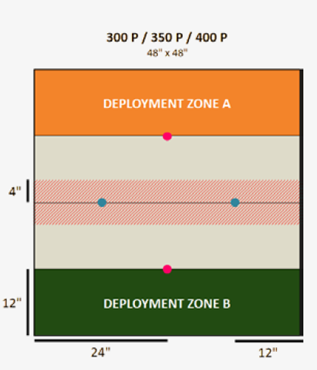
MISSION OBJECTIVES
MAIN OBJECTIVES
· At the end of the game, have the Enemy Prototype Captured (2 Objective Points).
· At the end of the game, have the Enemy Prototype Captured in your Deployment Zone (1 Objective Point, in addition to the previous Objective).
· At the end of the game, your Prototype is not Captured by the enemy (1 Objective Point, but only if your Prototype has not been Destroyed).
· At the end of the game, your Prototype is Destroyed (3 Objective Points).
· At the end of the game, have acquired more weapons or items from the Panoplies than the adversary (1 Objective Points).
CLASSIFIED
· Each player has 3 Classified Objectives (1 Objective Point for each one).
A few notes on some particulars. Prototypes cannot be attacked in the first round, except to pick them up. Any trooper can pick up a prototype, and they don’t need a roll to do so. They just cant be in a marker state. Once picked up, the trooper can’t declare move as a second skill unless they have the Baggage skill.
My game against Trevor (see this post for how that went) was my first time playing Corporate Appropriations at 300 points and was very educational. I don’t think that this Dragao list is bad at the mission, necessarily, but I think a combination of choices led to it being suboptimal on that table. We may keep that list in the back pocket.
In my opinion, for this mission, you want to have fast pieces to get to the midfield to recover the prototype you want to destroy and protect the other one. You at least want to make sure you destroy your prototype for 3 points (note: this prototype can’t be destroyed the first round). Then, when considering the points allocation, your second priority is likely Classified Objective coverage for another 3 points. Third priority is securing the other prototype (2 points) and, if possible, bringing it back to your DZ (1 more point). Last but possibly easiest, use the panoplies more than your opponent (1 point).
So, let’s break Acon down and see what we might use to achieve each of these objectives.
Getting to and destroying your prototype
I think Acon is actually very well suited to this part of the mission, especially if they can go first. With Dart, the Beasthunter, Peacemakers, and Nagas, there are a lot of options to start near the prototypes, even if the Exclusion Zone keeps you from starting immediately next to one. The only ones that can actually destroy a prototype are the Beasthunter and select Nagas. This makes it much harder for your opponent to destroy, especially with all of the DZ defense that Acon brings in minelayers and DZ repeater network.
The Beasthunter is likely the best option for a minimally order-intensive way to put wounds on a prototype, though it’s far from fool-proof. They’re reasonably fast and mobile with their super-jump, and the marker state on most of the profiles you want to use make it more likely to survive to reach the prototype.
The Nagas are a little expensive for what they can do which makes them a niche pick. I may try one out in a list soon, but I don’t think they’ll feature prominently in my lists for this event.
Other models that can do the job even if they have to travel farther include the Guarda de Assalto (D-charges), the Knights of Montesa (both foot and motorized with their DA CC weapon), the Machinist (D-charges), the Akal Specialist Operative and Kirpal Singh (D-charges), the Bagh-Mari Forward Observer and Stephen Rao (D-charges).
A haris of Bagh-Mari FO, Rao, and Montesa could be very handy in pushing into the midfield, or DZ once something else has suppressed the opponent, to take out a prototype. More likely I’d be using several duos and a haris with a scattering of these models in each to make for several different threat vectors the opponent needs to watch.
Classifieds
My philosophy on Classifieds at this stage of my experience with the game is: Try to remember they exist.
In list construction, I do try to get a good spread of models that can do the various objectives. SAA is in a great place to have models that can do Classified Objectives and that you would have brought anyway. Bagh-Mari, a cornerstone of the faction, can do 19 Classifieds (thanks, Infinity the Classifieds!) across their various profiles thanks to starting out as Veterans with a Multispectral Visor and NCO. Having a good mix of Bagh-Mari will get an Acontecimento player most of the way to the maximum 3 points Classifieds provide in this scenario.
Other great models that provide Classified coverage include the Montesa(s), Machinists, and Akalis. Akalis and Montesas provide the splash of Elite troops, and an Akal can walk onto the table behind your opponent’s forward defenses on Round 2 or 3 to get some better lines on those DZ or hidden HVT objectives.
Another important factor to consider is the Secure HVT and, this season, secure Treasure options. Again, for me, those are just things I need to remember to keep in mind.
Securing the enemy’s prototype
Shock Army has a quite few possibilities for getting to the enemy’s prototype to secure it, and a few intriguing possibilities to bring it back to your DZ quickly and efficiently. Many of them would require something to clear the way or suppress the enemy, but once that’s accomplished they’re well positioned to take advantage of the opening.
Dart could be an excellent choice. She’s impressed me greatly in my last few games with her, so she’ll probably end up in my list. She starts nearly at the prototype, and her Climbing Plus can help her get the last few inches if the objective is in an elevated location. She has no way to destroy a prototype, so you don’t have to worry about how to get her back to the midfield if your other anti-material options fail or fall. She is slow, however, only moving 4 inches at a time with the prototype (see the Common Rules of Prototypes). Any movement in the right direction at all is beneficial, so she might be a good option to start dragging it towards your DZ.
A Motorized Montesa Knight could be a great prototype carrier. At 21 points for the cheapest option (since picking up the prototype doesn’t require a specialist), being able to reach the prototype in one order and then get it most of the way back to your DZ in the next order would be very valuable. Even if the way isn’t entirely clear, the Knight may be able to move up in concealment and get close enough that the next order could be spent to move to the prototype and then back to the DZ with whatever movement is left in the first skill, and pick up the prototype with the second skill to jerk the prototype closer. If it can get into place with both wounds, then you’re less likely to lose the model after that skill that jerks the prototype back even if it’s exposed.
A third decent option to grab the prototype early would be with a Peacemaker and its Auxbot. Again, the prototype doesn’t need a specialist to pick it up, so SAA’s midfield models are all good candidates to snag the enemy’s prototype in the first round, even if it leaves a hole in your midfield defenses/crumple-zone. The higher speed of the Peacemaker and it’s bot make it attractive for the initial burglary, able to pull off a marginally slower version of what the Motorized Montesa can do.
Other possibilities include an Akal (an Akal or Singh may be able to walk on, jump to grab the objective, and then jump away with it at a decent speed with their super-jump), the Guarda (Heavy Infantry fast, and its Auxbot is faster on the way up), a TAG (after the game with Trevor, I’m more inclined to try this mission with a Tikbalang for that Climbing Plus than a Dragao, but they’re both fast), or one of the other remotes (Pathfinder and Bulleteer both have that 6 inch movement, and can more easily take fights on the way up).
Panoplies
If you can avoid being stuck or pineed down deep into your DZ, this one is pretty straightforward. But like the Loss of Lieutenant guys said in their CanCon episode, you have to remember to try to get at least one pull from the box each round, especially if you’re going first. This helps put additional mental load on your opponent as they have to keep that (possibly game-deciding) point in mind.
The Sacha is the only model available to SAA (this season) that would let you auto-open the panoply with Booty.
Final Thoughts
Coming out of this ramble I have a few thoughts and list ideas. The challenge will be forging them into a cohesive plan. On the bright side, I think most of what I’ve talked about here are also relevant to Evacuation, and aren’t detrimental to Superiority. While I should have gotten more practice with the lists in question before the event, if I were to take it very seriously, it should still be fun.
Let me know if I’ve missed anything in my plotting and scheming, or if I’m just absolutely insane below! Until next time!