Infinity - March Tournament
It’s been a minute! I was sick for a week and then focused on preparing for an interview for a new job, so I let my tournament prep posts fall by the wayside. After a mix-up with the host store on table allocation, it was finally rescheduled for the 21st. The mission changes didn’t help my motivation to continue posting that series either. At least not specifically as tournament prep pieces. With the new mission, Outbreak, being released, that got added to the lineup with Superiority, and then we ended up with Provisioning instead of either Corporate Appropriation or Evacuation.
And while I do have a piece on Superiority that I’m editing, I volunteered to take the bye that round to make sure other people that had to drive further got as many games in as they could. So I’ll put that up later, and we’ll talk about how the other two games went.
Since this is my first time trying to document a tournament like this, my picture-taking left something to be desired. We’ll do the best we can to talk through the highlights.
List 1
I made up a list for Outbreak based on what I had heard and read from other people, and with some things that I wanted to try.
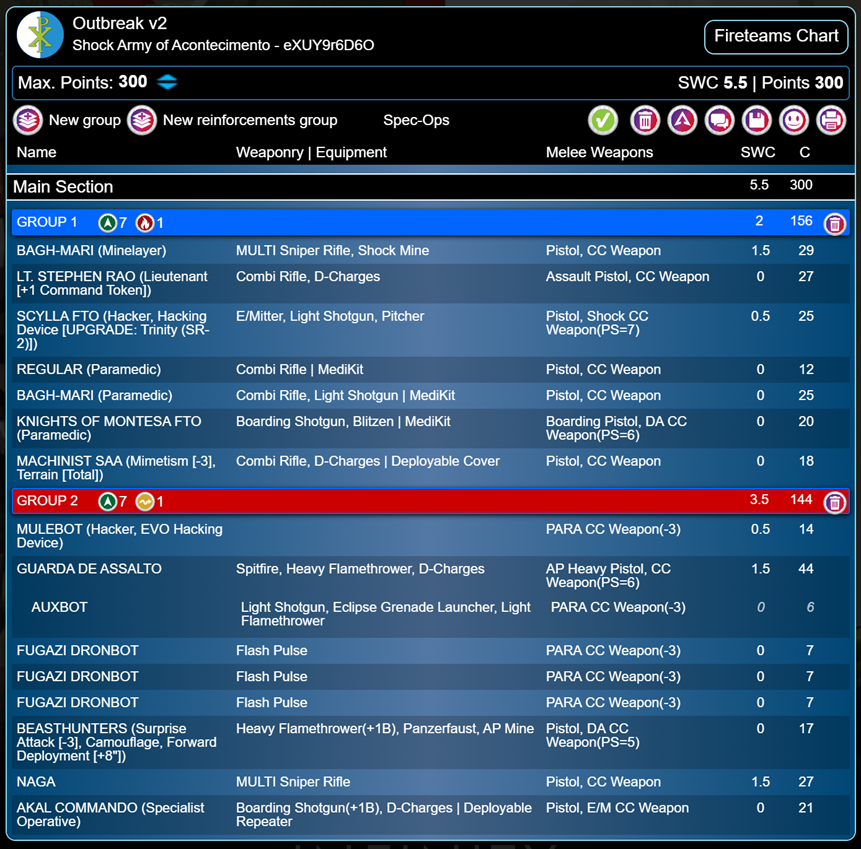
I wanted a list that had a few avenues to scan, stabilize, and pick up infected. I also wanted to play more with the Guarda de Assalto, and with my primary gun being just the Bagh-Mari MULTI Sniper I wanted something with high burst. I’ve had decent results with the HRL Guarda, but that’s still just burst 3, though the range bands are better. Still, the Spitfire isn’t bad. And if the table would really punish me for not having a long-range, high-burst weapon then, well, we’d go with our second list and endure the objective point consequences.
So in this list, the Bagh-Mari MSR, Rao, Scylla, and the Regular would form a fireteam that would primarily sit in the back and hopefully defend the stabilization zone. If worse came to worst, then the team (or elements of it) could go out and collect infected or do some scanning and stabilization with Rao and the Regular.
After some debate, I tend to prefer the +1 Command Token Rao over the +1 Lt Order Rao. Having so much NCO with Bagh-Mari makes the latter extremely attractive, and the choice very difficult, but with Speed Ball being such a large part of the game now and it being exceptionally great in a faction with lots of paramedics in a sea of low-Phys models (and ONE low-WIP doctor), still having four Command Tokens over the course of the game has been exceptionally useful. You don’t have to worry as much about having your fireteams broken with movement or to do missions, and there’s more cushion for failing important Engineering or Doctor rolls. It also grants you more opportunity for Coordinated Orders, which I’m very bad at recognizing and need a lot more practice with, but I probably could have done some very useful things with those in my two games in this tournament.
However, most of the active models in the group would be the next Haris team with the Bagh-Mari paramedic, Machinist, and Montesa Knight. This is the team that can move up together, fight if needed (with the Montesa taking point), do a bunch of scanning and stabilization, and two of the three can civevac infected.
I don’t know about anyone else, but I haven’t seen anybody really using Deployable Cover yet. The Vitroferro in particular seems to be a great way to help a Limited Cover model, like the Montesa, survive gunfights it loses due to not being able to claim cover for the face-to-face roll. It seems great in theory, at least. So far it seems clunky to make it work in practice, but I think it’s worth more practice.
In Group 2, we have the Guarda, which would end up doing great work in my game of Outbreak, as the primary focus piece. Its role is to take most of the gunfights in active turn (the Montesa can serve more ably as an ARO piece with its +2 SD while it’s a part of the team), and I’m pretty sure it can civevac one of the infected. Its Auxbot cannot, since it has the Peripheral skill, but the Guarda doesn’t have that skill, or any of the others that would prevent it from civevacing that I could see.
The Beasthunter is a useful midfield piece. It being nearly the only camo piece past the midline is kind of a tell, but it can be (and, spoiler, was) a useful short-range attack piece. And no one really likes a surprise Panzerfaust.
The EVO bot is generally useful, in my opinion. After playing primarily Invincible Army for a year, I find myself hard-pressed to leave the house without an EVO hacker. Here, its primary purpose would be adding a firewall for the Heavy Infantry attack pieces. Looking at it now, it may have also been fun to put Marksmanship or even Enhanced Reaction on the Guarda’s Auxbot. I, unfortunately, didn’t have the orders, much less the presence of mind, to do that over the weekend. The bot’s other purpose, of course, is to provide Baggage so that Scylla and the Montesa could reload their expendables. And the Bagh-Mari sniper, I guess, though that also slipped my mind on the day.
The last two pieces, other than the three Fugazis to bring me to fifteen orders, are in the list to give me options to get to Infected if my opponent decided to put his infected closer to the corners of the table. The Akal excels in general in corner deployments, with all that extra space to walk in on. And the Naga sniper can deploy either to grab such an Infected, or find a good spot to take some shots from an unexpected position. It’s still a little expensive, and I definitely woke up the day of the tournament thinking, “Man, I really should have just taken Dart. I’m really going to regret not taking Dart.” But I think that would have required either a major list rework or only going with 14 orders to fit Dart in. And I ended up fairly pleased with her performance.
List 2
I’ve been feeling like maybe I’ve been trying too hard with list building for Shock Army lately, and neglecting some of the things that bring me joy. In Shock Army’s case, that mostly means TAGs. I’ve used the Dragao a bit, but I haven’t indulged in some gratuitous list building in a bit. Bringing two Squalo Mk 2s and two Squalo Mk 1s to a couple games at the tail end of N4 is still a highlight.
I did want to take this event somewhat seriously though, so the Dragao and double Tikbalang lists I’ve been fiddling with aren’t quite appropriate to meet my goals with this event. That doesn’t stop me from running a Dragao and a single Tikbalang though. So, in a moment of whimsy, I submitted this list as my second for the event.
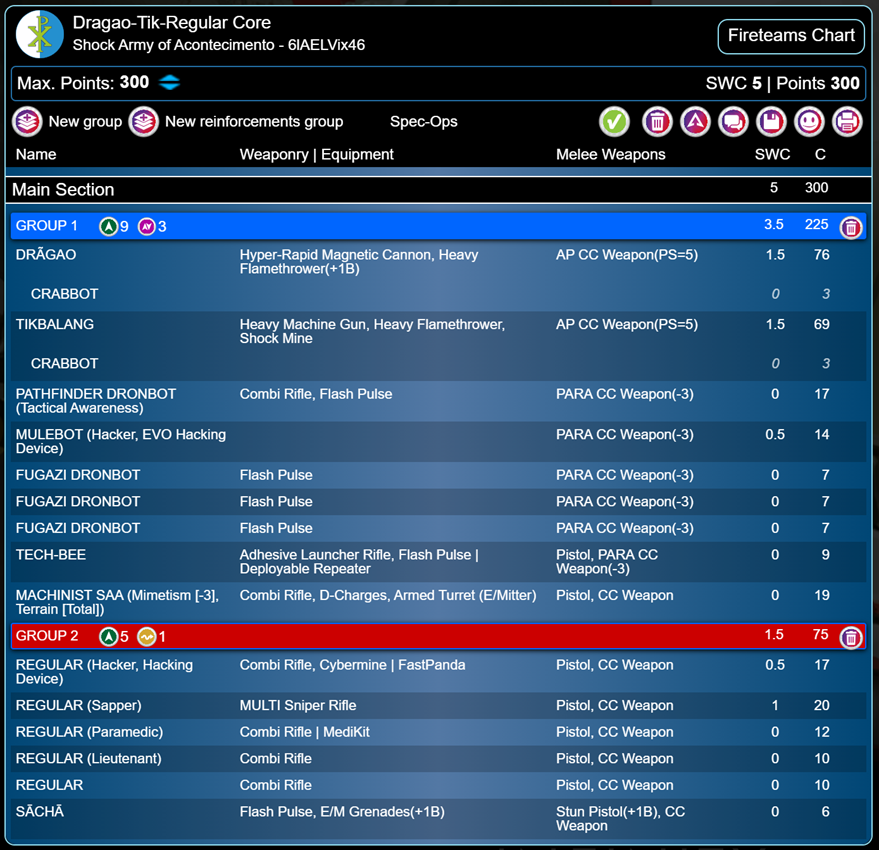
This one is pretty self-explanatory. I had intended it to be my primary list for Superiority, with the TAGs killing their way into the various zones and taking up space. The Regulars wouldn’t want to move much, but could push into the near zones to discourage any sneaky parachutists from trying to steal a near zone from me. The Machinist fixes the TAGs and deploys its E/Mitter turret, which I still think is kind of horrifying for a lot of attack pieces even if it doesn’t outright remove said pieces’ points from zones.
The Dragao would probably act alone to suppress, if not kill, threats at long range on the active turn, and would move into near zones to dominate them.
The Tikbalang and the Pathfinder would act as a duo, fueling each other and the Pathfinder providing Sensor coverage since I knew Metachemistry’s Ian and his Tartary bullshit would be in attendance.
Pretty simple and straightforward, if not always easy to apply to the task.
Game 1: Outbreak
So the first round would be Outbreak. I was paired with a newer player, but one who had been introduced to the game and played his first three games with Azoka, who is an excellent player that has won at least one Satellite, nearly took Krug last year, and is a common part of the Metachemistry podcast. So even if this was his fourthish game and he’s only been able to get a couple games a month in, his Bakunin list was solid and he played it very well. I used the Outbreak list, obviously.
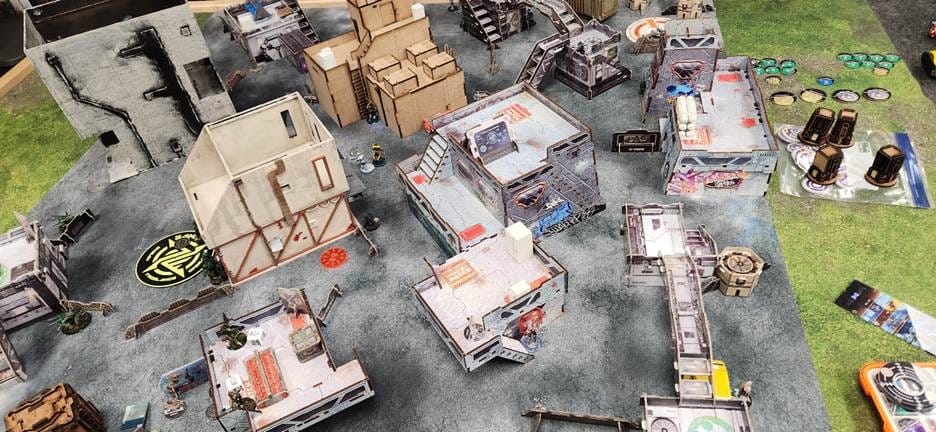
I ended up going and deploying first. He put one Infected HVT on one side of the Alpha Infected, behind a large building, and the other on the other side of the Alpha, again more or less in at the corner of a building. I put one of mine in a protected alcove on the other side of the building from where he had put his first Infected, and the other nearby the second HVT my opponent placed. I had been hoping that by placing the Infected near each other, I could just swing from one to the next and recover them quickly and efficiently.
We each put our stabilization zones in the spaces the table owner had conveniently left in the middle of our respective DZ. I know I was thinking that if I put mine further forward, I could get to it more easily. I think this was the right choice, at least in this instance. If I were second player, I might try harder to find a safer place for it.
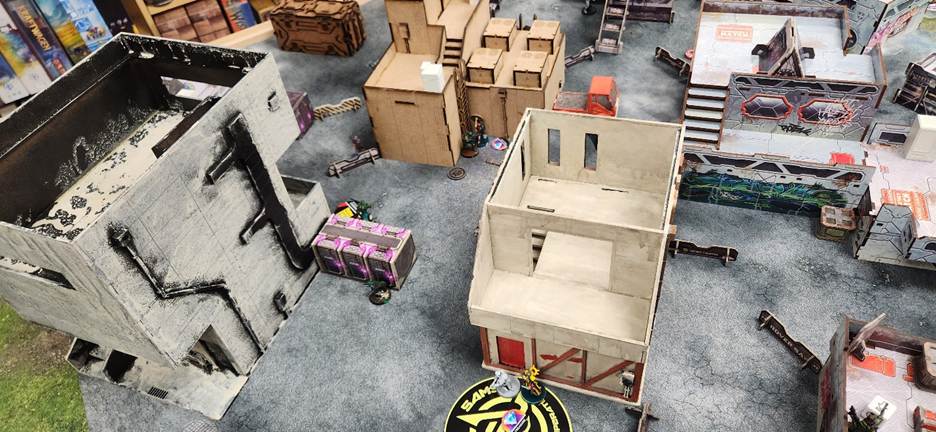
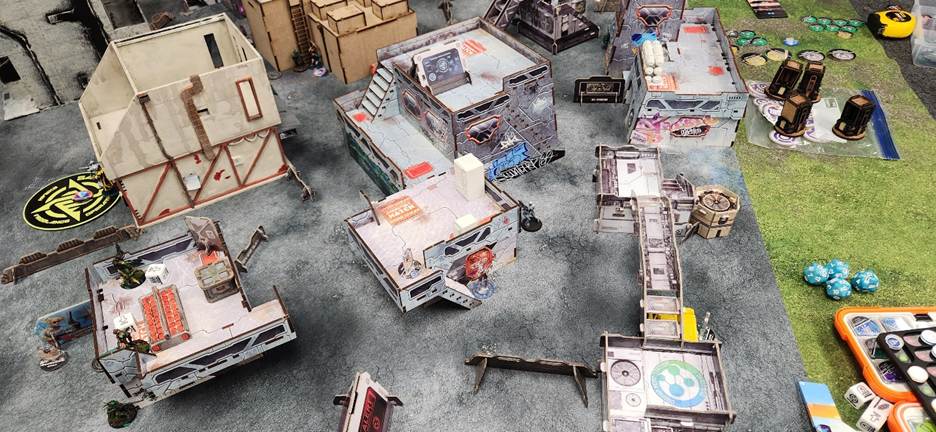
I tried to situate the paramedic team forward so that they could go and do that recovering for the three Infected around the middle. My four-person team went more along the right flank, with the paramedic tucked away behind the building holding the team together and being safe so that she could be one of my backup plans. Rao and Scylla went on top of a building, prone, with reasonable access to a staircase to go and get the other two Infected in my right-hand corner. The Bagh-Mari Sniper went on the ground on a corner of the building near the Regular, where she could keep an eye on people coming around to interact with at least one of the Infected in the corner.
The Naga went on top of a building in that right corner so that she could interact with and defend the Infected in that corner, including the one that the Bagh-Mari couldn’t quite see.
Lastly, The Fugazi went around the safe zone to help protect it. I realized halfway through the first turn that I put the EVO hacker in a sub-optimal position where it wouldn’t be able to reload anybody easily. The Beasthunter went down near the front corner of the building extending out of my DZ where she could watch the center Infected.
My opponent managed a pretty thorough null-deployment. He put down a Riot Grrl team, with Avicenna and Uahu behind one building. A nun team with Kusanagi, Wabarra, and a Custodier went around the corner on another building. One camo marker infiltrated into that right-hand corner where I had the Naga and Bagh-Mari sniper watching. A Marspider paramedic deployed in a slightly more precarious forward position, and likely was only really saved by being prone. Some Moderators were scattered around the safe zone, and the last of his initial deployments was an Uberfallkommando and her three Pupniks on my left.
My reserve was the Guarda. I put the Guarda between my two main teams so that she could move up an alley that was mostly blocked from my opponent’s DZ by a building between us. Unfortunately I put the Auxbot on the other side of the alley, next to my paramedic team, where something in my opponent’s DZ could see if it came around the corner to stay close to the Guarda.
And the something that would be able to see it was a Sin-Eater sniper that could see down that alley if the Auxbot moved too far around the corner, and into the intersection where the Alpha Infected was.
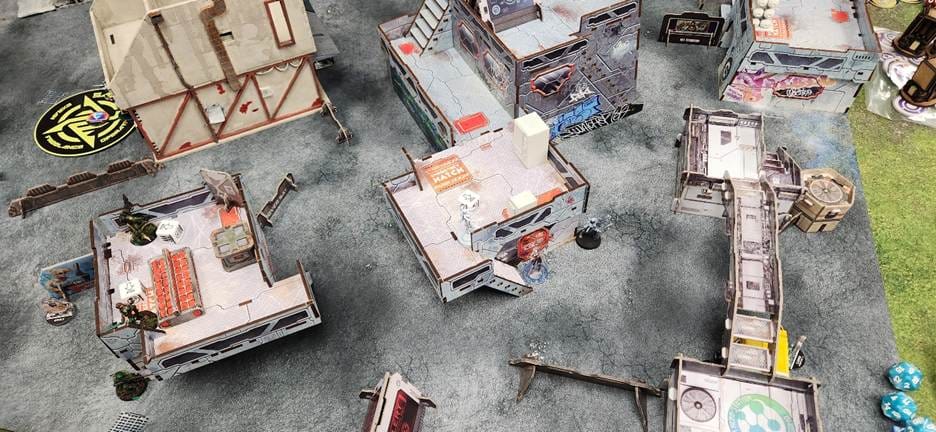
So, my first order of business was dealing with that Sin-Eater. The Guarda moved down the alley, with its bot following once it had laid down an Eclipse Grenade from its launcher to conceal its move across the alley. The Guarda puts the Sin-Eater down in their first exchanges, thankfully, and from their I just decide to run the Guarda around to the Alpha Infected, since it’s fast, and then around the building and back to the safe zone. So I really hope that I didn’t miss anything about the Guarda not being able to civevac and cheat my opponent because of it.
Once the way is cleared and the Guarda has finished its run, I move the paramedic team forward. Unfortunately, I spend several orders activating the team with the Machinist as the lead, intending to put down that cover for the Montesa. As they move, though, I realize that I want them closer before putting the cover down. So instead of activating someone useful to do some scanning of the Infected, I keep moving the Machinist and then re-thinking the plan. But eventually I do get to a point where I’m content putting down the Vitroferro for the Montesa to post up behind. The Machinist finds some cover, and the Bagh-Mari paramedic moves over to the other Infected in the middle and spends two orders to stabilize the Infected he’s standing next to.
At some point I realize that I’ve been using the wrong group’s tokens on my command board for things, and have to do some quick math to try to make sure I’m not cheating. I think it all worked out fine, thankfully. But it’s another example of not being meticulous in my play, which is something I really need to watch for. Especially for Infinity. In my defense in this case, I hadn’t been able to get a game in for more than two weeks because of that stupid sinus infection. Still, one should strive to maintain cleanliness in their play.
On my opponent’s turn, he spends most of his Group 2 orders to get the Chimaera and the Pupniks forward. There are some ineffectual shots from the Montesa against some of the Pupniks, but I won’t do any meaningful damage to them until they’re nearly on top of the Montesa. He keeps the Chimaera safely tucked around the corner of the building that the left-most Infected are clustered around, and only really needs to throw smoke grenades a couple of times.
Any orders in that group not spent on the Uberfall go to the Marspider, who hops up and sprints off to the right-most Infected. He manages to get into silhouette contact with the one that the Bagh-Mari can’t see, and, if I remember correctly, beats the Naga in a gunfight or using the flamethrower (since I managed to put her in a place where she could only use her pistol effectively to protect the HVT) and while she survives, she dodges out of line of sight and goes prone to preserver her life for later. The Marspider retreats a ways back around the corner.
The rest of his orders are spent on the nun team, and Kusanagi comes around the corner of the stairs by the Naga with vengeance for the Sin-Eater in mind. The Naga fails to dodge back to standing (when I manage to remember to do so once the stealthy nuns start shooting), and Kusanagi wins the gunfight against the Bagh-Mari sniper. I think she actually puts the sniper to Unconscious, and from there, my opponent dissolves the team so that Wabarra can go pick up the other Infected and start dragging him to safety. I had forgotten that she’s 6-2, and she hauls ass to link up with the Marspider.
Overall, a decent first round, with the score at the top of Turn 2 being 3-1, I think (assuming the game ended right there), in my favor with more Infected Stabilized, Stabilizing and civevacing the Alpha, and securing at least one Infected. Had I been thinking a little more clearly, I Might have even been able to get a third Infected stabilized with the Montesa or Bagh-Mari from the fireteam and maybe even get some scanning in, instead of having the Machinist wandering around like an idiot doing nothing especially useful. This might have freed up enough orders and space for the Akal to walk onto the other side of the table and be more useful there.
In Round 2, I engage the Pupniks and kill all but one who makes it into CC with the Montesa. At that point, I bring on the Akal and jump forward just out of Line of Sight of the Chimaera where he takes three shots with his Boarding Shotgun and puts her down. Then he picks up the last Infected and jumps into the stabilization zone. The Guarda abandons the Alpha Infected and moves forward to get back to the Business of Bullet, but has a hard time finding any more good targets to engage, so takes up a defensive position near the Machinist to watch over the Infected standing near the Bagh-Mari.
On the right side, the Regular paramedic takes control of her team and starts heading to the Stabilization Zone to pick up the Alpha Infected that the Guarda left behind. While she moves, she blaps the Bagh-Mari sniper with a medikit dart, and miraculously the sniper stands back up. With the next order, the sniper assumes leadership of the team and takes on Kusanagi, who my opponent thought about moving back behind the stairs and decided not to. The Regular keeps moving toward the Alpha Infected, and the Bagh-Mari defeats Kusanagi now that her fireteam was broken to let Wabarra pick up one of the Infected. Kusanagi takes a wound and goes into No Wound Incapacitation, and tests to fail guts and disappear behind the staircase again.
More orders are spent to get the Regular over to the Alpha Infected and pick him up. Rao and Scylla stand up to offer more AROs in the next round. At this point, I’m pretty sure that we won’t get to a third round, so I make some choices that are more about protecting what I already have instead of setting up for another round.
Unfortunately, I don’t have enough orders to really make a good go of it. The Akal should have gone prone at the end of his run, and I should have tried to find a way to get him either into more cover or out of Line of Sight. In hindsight, had I deployed the EVO bot a little better, I might have been able to drop some more Vitroferro into my Stabilization Zone for people to hide around, and then pick up another set on her way to do mission stuff with the paramedic team.
In my opponent’s turn, he spends a few orders getting his Infected stabilized and scanned. Then he burns the rest of his orders in the nuns’ group to go on a murder-spree with Kusanagi. She peeks out to fight the sniper and wins the fight, but doesn’t kill the sniper. Unfortunately for me, the sniper fails guts and withdraws around the corner. From there, Kusanagi aggressively advances, engaging both Scylla and Rao from out of cover as she sprints around the corner, and neutralizes both (killing at least Rao). Then she gets to a point where she can see the Akal and the regular and eventually puts both of them down as well before running out of orders.
From there, he finally activates the Riot Grrl team and in the last few minutes we have, he runs them into the middle, tanking a Beasthunter Panzerfaust to kill the Bagh-Mari paramedic and deny me control of any of the Infected on the table.
And with that, in the last few minutes of the game, he swings the score from me having a fairly commanding lead, to him winning 5-3. That’s probably turnabout for my 6ish point swing in the first round of the local Escalation League (more on that in the future).
Breaking it out a bit, I end up with 2 points for stabilizing more Infected (thanks, Stabilization Zone!) and another point for one of those being the Alpha Infected. My opponent got 2 points for scanning Infected, 2 for civevacing more stabilized Infected at the end of the game, and 1 for Securing at least one Infected. Like a mentioned above, I definitely should have spent more effort getting some scans in, instead of messing around with the Machinist. So many orders were spent getting her far enough forward to drop some cover for the Montesa instead of activating the team with the paramedics to get scans done. That alone might have helped me get to a 6-5 victory. My opponent did a great job remembering that part of the game, and his final attack runs to deny me the civevacing points was a stellar move.
In any case, it was a great game, and my opponent did exceptionally well for one of his first games!
Game 3: Provisioning
I volunteered to take the bye in Round 2, since otherwise one of the newer folks from Colorado Springs might have been assigned it due to his standing, and he was going to have to leave early anyway. I also wasn’t terribly enthused about likely facing Ian’s Tartary in Superiority. The last time we had played, I had taken the Tiktikal Awareness list that Rob Shepherd put in his Kestrel video, and I had planned to use that Dragao-Tikbalang list for Superiority here. I didn’t feel a need to repeat that here.
So I took the Round 2 bye assuming I’d be paired with someone else for Round 3.
I was not.
Thanks to the vagaries of CorvuSphere, my Round 3 opponent would still be Ian.
Which was fine, since I do enjoy playing him, and having said to his face that a secondary reason I took the bye was to avoid his Vystrel-Camo nonsense made the Round 3 pairing hilarious.
I unfortunately was totally out of sync with my plan to do this blog by this point in the day, so I don’t think I got a single picture of the table, much less the game. We were playing on Trevor’s table, so while the layout was different, it was somewhat similar to the table in this battle report.
I ended up with first turn and deploying first. I put my Safe Zone just outside my DZ on my right side, in a street that was about halfway between the center and right consoles. I went with the Outbreak list so that I had plenty of specialists to pick up boxes. I also completely forget what my Classified Objective was. I think I needed to do something with an HVT, but it wouldn’t come up anyway.
The four-person team also went on that side so that the Bagh-Mari sniper had a great line down that long street that ended just on the edge of Ian’s DZ. The paramedic team went in a courtyard to the left that would make it hard for Ian to see, though there were only a few exits from that courtyard that could all be pretty easily watched. The Guarda also ended up in that courtyard to try to get some fights that were more advantageous for its range bands. The bots went in a couple places to watch approaches to the DZ and the Safe Zone. I did a little better putting the EVO in a place where it could provide reloads this time. The Naga went on a tall building in the right hand corner.
Ian put his Vystrel teams in obnoxious places. One on top of a building where it could watch approaches to either the center or left console, and the other watching down the same street as the Bagh-Mari sniper. Both were teamed with Dozers to get them Engineer support and a Special Die. The last time I had to deal with these teams, it took two rounds to actually put them both down for good, though I had knocked them both out fairly early in the first round, and I was not looking forward to dealing with that nonsense again without TAGs. In the center went a sea of S2 and S5 camo markers. It’s been a minute since I looked at Tartary, and Ian’s last list didn’t feature nearly as many Strelok K9 teams. The last few deployments were 112 bikers.
I spent forever getting through Round 1. I really need to pick up my pace of play.
It started with the Bagh-Mari sniper moving to get some shots on the Vystrel watching the street. Fortunately that went well, and I put the Vystrel down in the first shot. I then moved forward again to get the team into better positions and took another shot at the unconscious Vystrel to remove it.
I wasn’t going to deal with that nonsense again if I didn’t have to.
I moved the Guarda into an archway and tried to discover one of Ian’s S2 camo markers that was peeking out of another archway across the street. The Guarda failed the discover, which meant it wouldn’t be able to discover against it again this round. I kind of completely forgot about that, though, since I had already decided that my next action, if I did fail the discover, was going to be to Intuitive Attack the marker with the Guarda’s flamethrower since I was already a hair outside of 8 inches. On declaring that, Ian decided to reveal Pavel McMannus and shoot me with his Ohotnik.
And Pavel beat the Guarda’s roll. And the Guarda failed its save. And went unconscious.
Great start to my run on that flank.
And then, forgetting I had bought a Speed Ball, I tried to resurrect the Guarda with one of my paramedics. To be fair, the Guarda has ORC Phys (14), so I did have a 70% chance of standing up again. But why risk a 30% chance of killing a model, when you can guarantee picking it up? Because I’m a fool, and I promptly suffered the consequences when the Montesa killed the Guarda with his medikit.
With my high-burst gunfighter out of action, I then tried to deal with Pavel via the Montesa. That also didn’t really work out for me. Pavel also put the Montesa down when it came around the same corner that the Guarda had died at.
In an effort to make something happen, I brought the Akal onto the table on my right side in the hopes that he could jump up and grab a box before the turn ended. Unfortunately the surviving Vystrel would have been able to see him. So I revealed the Naga and tried to engage both Pavel and the Vystrel. Ian shot back, and with surprise on her side, the Naga won that first gunfight (if I remember right), but both her opponents made their saves. Trying again got the Naga killed.
From there, I might have moved the Bagh-Mari sniper’s team up a little further, doing some discovers and trying to provoke more AROs from the sea of camouflage. I might have gotten lucky and discovered and killed a couple things. I’m pretty sure the sniper moved up into a little gazebo thing and finally brought down Pavel, tanking at least a couple arrows and trench hammers from the Antipodes. Honestly, the Sniper was either MVP or tied the Beasthunter for MVP of that game. She fought and killed so many Antipodes and human Ariadnans at point blank range with her rifle.
In Ian’s turn, he advanced a bunch of markers and the 112s went on a tear and pulled 3 of the four boxes and brought them all back to his Safe Zone once he had forced the sniper back around the corner. I think that was the majority of his turn, though he might have lost a couple models in forcing the sniper back. He might have moved one of his camo markers (a tank hunter) to start staging its attempt to accomplish his Classified, and moved the Dozer partnered to his dead Vystrel (I think) forward to suppress down the street. The Sacha also moved up into the intersection near the center console.
Ian was admirably quick and efficient in his turn. Again, something I need to work on.
My second turn started off with my Beasthunter jumping out from where it was guarding my Safe Zone into the intersection in front of the Bagh-Mari sniper and her team. Ian declared a couple Holds and a couple Discovers. I declare Move as my second skill, to get around the corner a bit and closer to where he had clustered one of his 112s, a Strelok, and the suppressing Dozer. He does discover the Beasthunter, but now she’s in a better spot. I activate her again, and try to get a little more movement to get good angles. Ian does his level best to kill her with most things, while dodging with the Strelok and the 112. I drop two flamethrower templates (after spending too much time deciding whether I want to double tap my primary targets, or split and hit the Sacha, finally deciding on the latter). I consider this a suicide run, but the Beasthunter tanks the Dozer’s rounds, the Sacha’s flash pulse (I think), and a trench hammer, and kills an Antipode, the Dozer, and I think manages to tag either the 112 or the Strelok.
Once that’s resolved, I activate her again and template the models that survived the first burst. This time she fails her saves and ends up isolated and possibly unconscious. But she’s cleared the way for the Bagh-Mari team.
My plan here was to move the Bagh-Mari forward enough to engage the last Vystrel so that I could get the Akal safely over to the last console, and the rest of the sniper’s team into the Safe Zone and start recovering Ian’s boxes. Unfortunately the sniper’s luck finally fails here, and she eats a light rocket as she peeks around a corner. At this point we were pressed for time again thanks to my indecision, and I was less careful with my positioning, but Rao and the Regular both somehow make their saves (Scylla had been deployed on a roof and I didn’t bother trying to get her down to contribute more meaningfully to the game).
Out of options and orders in that group, and rapidly running out of time, I risk the Akal in a jump onto the building and declaring a Dodge in response to Ian shooting it with the Vystrel. The Akal fails its dodge and eats an Autocannon round. And that’s about all I manage to accomplish in this turn.
Ian spends his last turn running his Tank Hunter HMG around the side and making his WIP roll once he has my HVT in Zone of Control and Line of Sight.
And with that, Ian wins, 9-0.
Despite getting stomped, I did have a good time in this game. Infinity is just such a cool game that can generate some marvelously cinematic moments, and I’ll be exulting in my Bagh-Mari sniper’s moment of heroism for a long time to come. It was also nice seeing a Beasthunter actually do quite a bit of work too. I feel like I get mine killed before that moment more often than not.
My Final Standings
I ended up 10 out of 11, though there were a bunch of byes and drops as people had to leave early. But for not having played for two weeks, and not having taken Shock Army to a tournament before, I think it went alright. Mostly content with my performance, with plenty of things to improve on for next time.
I enjoyed playing the Outbreak list quite a bit. I think I may need to adjust it a little bit to feel even better. Finding a way to trade the Naga for Dart is probably the way to go, and it would be very nice to have another, longer-ranged, high-burst weapon in the list. That might be asking for too much.
After some games with JSA Oban in the Escalation League, where that faction simply doesn’t have many great gunfighters but make up for it with asymmetric play in things like Oniwaban, I think SAA might have some similar play options. They do also have quite a few great gunfighters, but a skilled player may be able to sacrifice some of that gunfighting ability to get several strong asymmetric advantages.
Now I just need to get there. But that’s what this blog is for!
In the meantime, if you’ve found this helpful, entertaining, you can now follow and/or subscribe here directly or on Patreon (some construction is ongoing there)! I’ve also set up a Ko-fi if you prefer to support these rambles that way, or just want to throw a couple bucks my way if I stumble upon something profound. I’m also open to accepting suggestions for things to talk about in the future, and will (generally) prioritize the topics that come from subscribers. Either way, thank you for reading. Until next time!