Metachemistry's Training Incident: Mission One
The Metachemistry guys are starting the spring escalation league this week! I’m lucky enough to be a local in their area, and I definitely had to sign up. Last year’s was a ton of fun with a huge turnout, likely due to the debut of N5. This year’s league doesn’t seem to be quite as big, but it’s still a solid 20 players with a significant percentage of them being new players.
Devin’s created a lineup of custom missions to give newer players a feel for the game which you can find in the Metachemistry Discord if you’re interested in checking them out. And for veteran players, it’s a great way to get scheduled games in at least once every other week, and a great excuse to start a new army or pull an old one out from the shelf.
I’ll be playing some of my first games with JSA Oban for the league, and trying to get everything I use painted. Maybe I’ll even get all of my Oban models painted!
Maybe.
In any case, I want to lay out my thoughts to better plan for each of these missions and learn the faction. Today, we’ll start with the first mission, Take and Hold.
The Mission
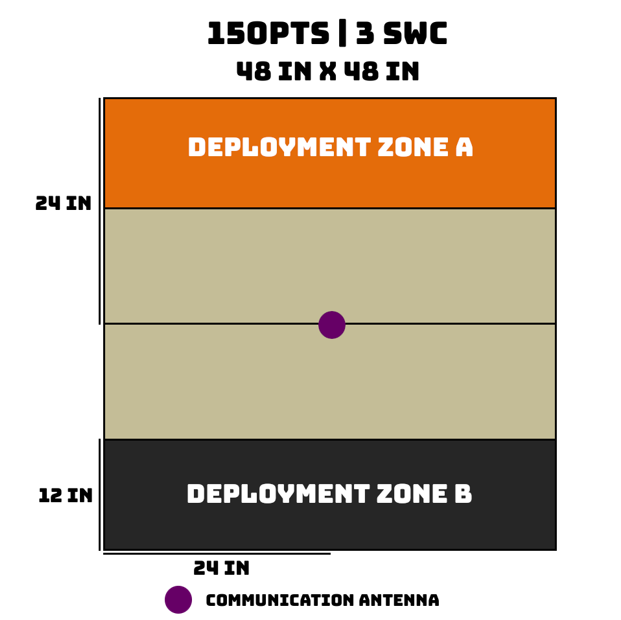
As the first mission of this escalation league, this one is played at 150 points. It also specifies that Command Tokens can’t be used and that Fireteams can’t be formed. Devin is a big believer in keeping games on a 4’x4’ table, regardless of the size, which I generally agree with. 150 points on a 4’x4’ feels a little thin, but in my opinion, the official table size for that points level starts feeling a little claustrophobic, with too few possibilities for advance. Having more space to move your fewer models can help keep them alive long enough to get to grips or do an objective in a game this lethal.
Most of the objective points in this mission revolve around keeping as many of your models alive as possible. Keeping 40-75 points alive counts for 2 objective points, 76-125 for 3 objective points, and more than 125 points surviving for 4 objective points.
You get 2 points for activating the Communications Antenna in the center, and an additional 3 points for controlling the Antenna. Operational Learning is in effect for activating the antenna. I think Operational Learning is one of the coolest new rules in ITS scenarios, and is exceptionally great for onboarding new players. If we can hook them on the game, then there will be plenty of time for them to experience the same pain as veteran players that have seen models fail roll after roll in missions without the rule.
The last point comes from a specified bonus objective, taking the place of a randomly drawn Classified Deck objective while maintaining the flavor. In this case, we have the classic Combat Support: remove a wound from an allied trooper with a Doctor/Medikit or Engineer/Gizmokit.
So, we need to keep things alive for the primary and bonus objectives, then get to and activate the Antenna. This is a mission that heavily favors second, I think. It lets you get the last word on both players’ remaining victory points and the Antenna.
Let’s see what we have to work with.
Bending the Faction to Our Purposes
I have some passing familiarity with the faction, thanks to it being a very cool-looking one driving my curiosity, and being in the same meta as Azoka, who has been on Metachemistry before and was a finalist at the 2026 Krug and is a big fan of JSA. Several of my first games against him at the tail-end of N4 were into his JSA when it was still a Non-Aligned faction.
So when I see that I need to press a button and hold an objective in the middle of the table, I immediately think: Ninja. The Ninja Killer Hacker can easily deploy next to that antenna on my side of the table and then just wait until the end of the game to crawl over to it and tap the button. It’s not the cheapest, especially with only 150 points to work with, but it’s easily game winning. So it goes in the list.
Next, I want to eliminate my opponent’s models at minimal risk and cost to my own. I feel like most of Oban’s best gunfighting is on some pretty expensive models. Much of Oban’s most visually enticing and powerful models are rather expensive. It can be balanced by taking one of the cheapest (and now possibly one of the best?) line troops in the game, but when I started fiddling with lists I was still having trouble balancing keeping what I felt were mission-critical capabilities in the list with adding cheap orders.
So none of the lists I created were particularly heavy in the gunfighting department. Not using fireteams also hinders Oban’s gunfighting potential, in my opinion. So we need to get creative.
I think we need a gardener, to get close and prune our opponent’s unnecessary models so that we can clear lanes for our backup plans/killers.
Also, Oniwaban are dope as hell. If anyone hasn’t started Gabriel Miller’s Death Song, I highly recommend it. The Oniwaban character in that book is a chef’s-kiss delightful stereotype.
Like I said above, the Oniwaban is probably my reserve drop, and we fervently hope he doesn’t manage to fail the infiltration roll. Though even if he does, a lot of the table may just be empty at a 150 points. It may take him an entire round and a half to get back into position, but I consider it likely that he’d be able to. Unlike a Shikami, the Oniwaban isn’t a specialist, so his only role is murder. If my opponent is a veteran player, then I don’t feel bad about going straight for a decapitation strike if I can (or if I happen to stumble on one). If my opponent is newer, then maybe we don’t do that on Turn 1. After all, this league is to encourage new players to come back.
I think beyond those two models, we have a lot of options. An O-Yoroi at 150 points is a bit much, both for me fueling it, and for an opponent that may be newer. Adding another model that can get up close to shoot/chop/push-buttons seems like a good plan. Maybe something durable like the Karakuri to defend the point if we have to go first. Domaru are cool and would probably be one of the premier options for a brawler to take out my opponent’s models. Fireteams are out, but getting that Tanko with the Disco Baller seems like a good idea to get some vision control up so that my samurai and other assaulters can get to their good ranges. And if we’re relying on those Disco Balls, then we should bring some baggage to reload them.
One of the first lists that I was content with looked like this:
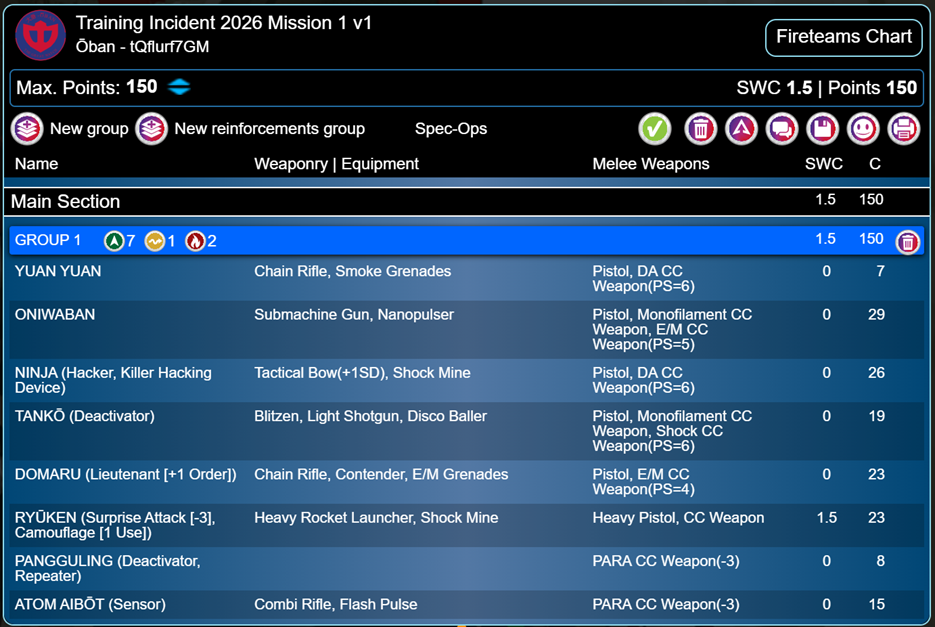
We have our Ninja, Oniwaban, Tanko, and Panguling. I went with the cheaper Domaru Lieutenant with an extra order as a relatively durable lieutenant option that brought plenty of orders to handle things himself since we can’t use fireteams in this mission. I chose the Ryuken Heavy Rocket Launcher as an ARO piece that should be relatively challenging to dislodge, depending on the matchup. I put a Sensor/Forward Observer bot in the list, since Ian is also in the meta playing Tartary Army Corps. I know there is also at least one person playing Shindenbutai with their own Hidden Deployment games. If anyone else besides me is putting camouflage or Hidden Deployment models near that Console, I’d rather know about it, especially if I end up with first turn.
With the remaining points, I had the choice of either a Sacha or a Yuan Yuan. As neat as the Sacha is, I decided to prioritize some backup vision control with the Yuan Yuan.
I’m not totally happy with not having a way to get the bonus objective point with no way to restore wounds, but at the time I figure that I can get enough points otherwise that it’s not necessary.
Testing
I started making another list in the leadup to the league starting (that’s the problem with too much time to think about things like this), which I’ll talk about in a minute, but I was fortunate to get a practice game in with this list with one of our newer players a couple weeks ago who wanted to try out the mission ahead of time. It really gave me a chance to prove out some of the concepts I had been thinking about and that I outlined above.
I can’t remember who won the roll-off. I seem to remember my opponent choosing to go first (generally a safe option for new players to ensure they get to do things, in my opinion, even if the scenario incentivizes the opposite). I’m pretty sure I took the opportunity to deploy second.
My opponent, Pear, was playing the Steel Phalanx half of Blackwind and the Beyond box, and based on his learning of the game so far he tried to defend his whole DZ. So there were 2 Thorakitai on either side of the table, at least one Hidden Deployment model (which may have been his own reserve and that I immediately forgot existed), and a pair of camo markers near the midfield, just forward from his DZ. Just offset from the middle, with easy access to the console along the roads of the mat, was a Hoplite Heavy Machine Gun and a Chain Rifle Myrmidon.
The ninja took up station hidden right next to the center console, and I held the Oniwaban back as my reserve. My Ryuken took up position in a tower in my DZ looking over the road the Myrmidon and the Hoplite would have to take to move to the Antenna, and his decoy went nearby. The mine went out to the edge of my DZ behind a building to try to catch any aggressive Greeks that tried to intrude into my DZ and kill my sensor bot or Panguling. The Tanko and Domaru went nearby each other out of immediate line of site of the Hoplite. The sensor bot went to the other side of my Ryuken behind a column to keep an eye on the left approaches.
My opponent then placed his reserve. Again, I think that might have been his Hidden model. I then put my Oniwaban just in front of his Hoplite, which may not have been the best option thanks to the Hoplite’s Immunity (Enhanced), but fortunately worked out. I was nervous about the Infiltration roll, but that went just fine. I think I rolled, like, a 13? Something a little high, but a comfortable success.
His first turn was pretty conservative, much more than I thought it would be. He did some moving around and the Myrmidon attempted to lay down some smoke to cover the Hoplite’s movement. That did not work, but the Myrmidon did start creeping up the stairs on his side of the building the Antenna was sitting on. There was some learning about potential options, as my opponent was concerned about getting the Hoplite in a place to Discover the Ryuken so that he could shoot it. We worked out that the Hoplite could move to the edge of the building he had been concealed behind, going prone at the end of the movement, and then moving again along the barricade to get a good view on the Ryuken’s markers once he stood up. He spent the orders to stand up once he was in position and tried to Discover.
It was at about this time that I vaguely remembered the Immunity, and so I declared no ARO. And it turned out that the Hoplite was on pretty terrible numbers to make the Discover.
My opponent brought on an Ekdromoi near his DZ, and did some jumping around to set up a possible attack into my DZ in a future turn, and that was pretty much it.
In my turn, I used the Tanko to put down a Disco Ball to block the Hoplite’s line of sight down the street so that the Domaru could get up past the halfway line and set up for some attacks into his DZ. I overextend a bit on a second skill, and my opponent reveals the Agema that I had completely forgotten about. Its MULTI Sniper Rifle puts a wound on the Domaru, and we miss that the camo marker that definitely sees the Domaru just outside of its Zone of Control should just as definitely have reacted since that was the Thyreos’s mine. I should have pressed him on that a little harder, but let it go instead. I manage to pull the Domaru back behind the wall while not taking another wound in the process, though it would have been nice to drop the Agema.
Once there, I decide to move the Sensor bot up to back up the Domaru in the reactive turn and prepare another option to push the button.
Pear does some more moving with the Ekdromoi to get closer to the Antenna, and does the same with the Myrmidon. Once the Myrmidon covers the Domaru and sensor bot with smoke, he moves the Thyreos into melee with the Domaru, where I’m reminded that those carry monofilament weapons, Natural Born Warrior, and CC Attack (-6). Extremely rude. Fortunately, the Domaru is fine. Unfortunately, so is the Thyreos. At this point, I’ve pointed out that the Domaru is the only lieutenant possibility in my list, so the attempted assassination isn’t entirely unexpected, and is what I get for being so aggressive with it so early.
When it comes back to my turn, I decide to return the favor. The Oniwaban emerges and moves into silhouette contact with the Hoplite, which is still looking down the street. I forget the Oniwaban has two different weapons when I declare my attack, so I err on the monofilament side when I win the face-to-face and the Hoplite of course passes the saves with its Immunity. We both kind of forget the Ekdromoi, I think. The second order goes more in my favor, though I owe Pear an apology for forgetting how E/M works with Immunity. I thought it still kept the 2 saves per hit, so he was rolling 6 saves from two crits, if I remember right.
So the Hoplite goes down, and the Oniwaban manages to evade the chain rifles from the Ekdromoi in order to go prone and re-camo so that it can hunt the Agema. From there it tries to hide from the Thorakitai that could move out from their hiding spots to hunt it in turn on the last turn.
Pear spends his last turn in Loss, thanks to the death of the Hoplite. The Thyreos spends its order to try and kill the Domaru, but fails and dies. I think the Myrmidon chucks a grenade over the railing of the Antenna building and that finally does the trick. Both Thorakitai try to kill the Oniwaban but neither manage it. The Ekdromoi tries to move closer to the Antenna to control it, or at least get into range to dodge into it during my turn. The Ryuken finally reveals to try to take it down but fails.
I now start my turn in Loss, and decide the main thing that needs to happen in this turn is use the Ninja per the plan. No other model in my list is going to be able to accomplish anything of note with their single orders. The Ninja reveals in a camo state, goes prone, and moves to the Antenna. The Ekdromoi is the only thing that could have seen it, though I can’t remember what the ARO was. The Ninja goes to push the button, which lets the Myrmidon attempt its own dodge. The result is that everyone… fails.
And that was the test game. The ninja and Oniwaban did exactly what they were supposed to (for the most part). The Tanko was useful. As for everything else, one game isn’t definitive, but I was definitely leaning very heavily on the Oniwaban to solve any long-range gun problems for me.
Alternatives
I had already been thinking of using a different list, this one focused on standing on the Antenna and just not dying. After seeing the Hoplite’s Enhanced Immunity in action, I’m even more interested in seeing what a Karakuri can do. Here’s the list:
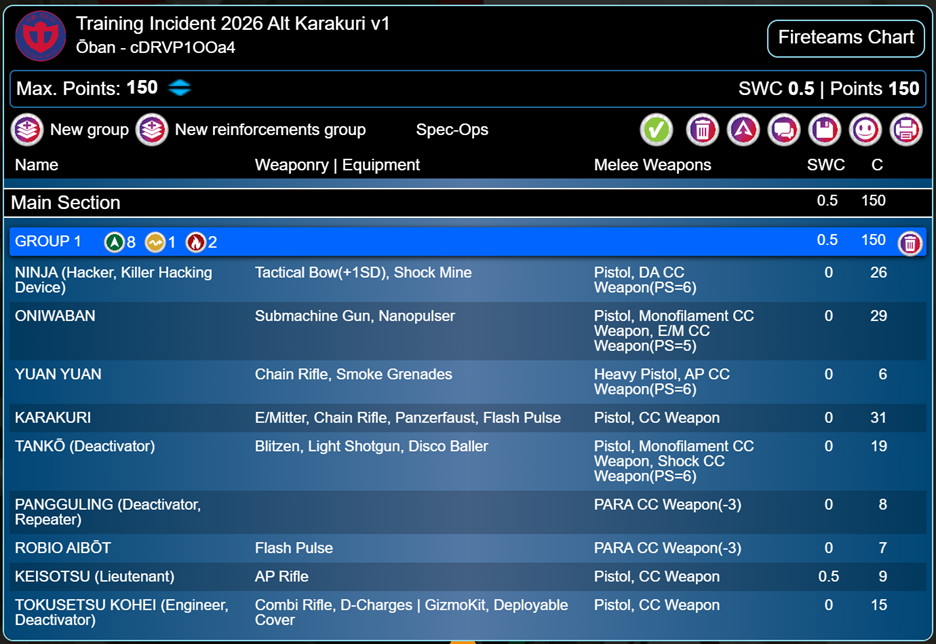
Very similar to the first list, but we dropped the Domaru, the sensor bot, and the Ryuken to fit in the Karakuri, an engineer, and a Keisotsu Lieutenant. It still feels very anemic on firepower, especially lethal firepower, but I’m hoping the durability is generally better and the engineer gives me the ability to score the bonus objective. We’re probably still very reliant on the asymmetric problem-solving that the Oniwaban provides.
I think this will be the list I end up going with, so we’ll see how it goes.
Final Thoughts
I’m really looking forward to this league. It should offer a great way to learn Oban, which will provide me a bit of a break from the grind with Shock Army. Flexing a slightly different set of skills with Oban will also hopefully help with my gameplay overall, which is my favorite part of playing different factions in games. And Infinity has so many factions to look at the game through.
In the meantime, if you’ve found this helpful, entertaining, or just want to see how the trainwreck eventually unfolds, you can now follow and/or subscribe here directly or on Patreon (some construction is ongoing there)! I’ve also set up a Ko-fi if you prefer to support these rambles that way, or just want to throw a couple bucks my way if I stumble upon something profound. I’m also open to accepting suggestions for things to talk about in the future, and will (generally) prioritize the topics that come from subscribers. Either way, thank you for reading. Until next time!