MetaChemistry's Training Incident: Mission Three
Not going to lie, this game was rough and aptly named. My opponent, Sean (Section9), was delightful, but merciless.
First let’s talk about the mission.
Training Incident Round 3: Point of Failure
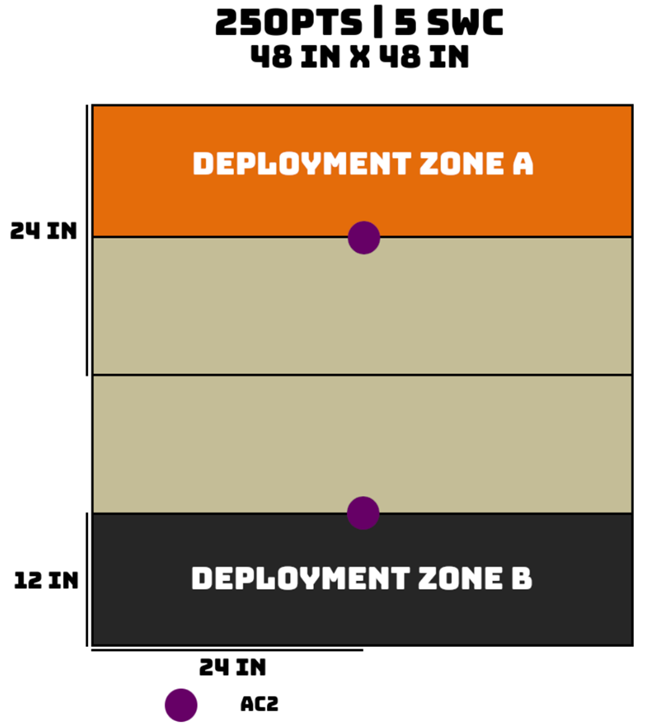
This is a pretty straightforward mission. Keep the enemy from damaging your AC2 (1 point per STR remaining on your AC2 at the end of the game for a total of 3 possible). Damage the enemy AC2 (1 point per Wound on the AC2 at the end of the game for a total of 3 possible). You get an additional 2 points if you destroy the enemy AC2. And last, completing the Sabotage bonus objective gets you 2 points.
To complete the bonus objective, you need to privately choose a piece of scenery that’s totally inside of the enemy Deployment Zone after the Initiative Roll but before Deployment. Then, during the game, you need to move a model with D-Charges into silhouette contact with the piece of scenery and place them. Then you can detonate them and that completes the objective.
The AC2 has ARM 6 and BTS 6, 3 Structure, and are Size 5. An AC2 can only be damaged by CC Attacks with weapons that have the Anti-material Trait (Double Action (DA), Explosive (EXP), T2) or by placing D-Charges in demo mode (like you would to complete the Sabotage objective).
The AC2s have an Automated Defense System that don’t appreciate their AC2 being smacked by a CC attack, and will zap the offending model with a CC attack of its own with a value of 8. The attacking model can’t add any MODs to their CC attribute. If the AC2 wins the face-to-face, the attacker needs to make a save against a Stun Ammunition hit with a PS of 5. Fortunately, using D-Charges doesn’t trigger the ADS.
This mission is played with 250 points and 5 SWC.
And that’s pretty much it.
Plotting
I’ve been making it a habit to put some thought into listbuilding before I know who I’m paired against, which got me into a bit of trouble last time when I got lazy and didn’t think of a real counter to a probable Hatamoto. This time, once the pairings were announced, I went through a cascade of lists before finally settling.
This time I was paired against Sean (Section9) who has been playing Military Orders for the league. I was very excited to get some duels in between the Christian knights and some of the more elite samurai.
Oban has no shortage of great swordspeople, many of whom are given weapons that can devastate an AC2. D-Charges are comparatively rarer in the faction, but also far from unknown. So my thought was that if I could get to the AC2, I could almost certainly destroy it.
I had originally been thinking of using this mission to start running the O-Yoroi. The league has some achievements for various things, and one category is the Ironmonger category. The easy achievement is repairing a Wound on a TAG with a Gizmo-kit or via Engineering, and the hard achievement is putting an enemy TAG into a Null State with your own TAG. It was likely going to be a little early to deploy a TAG like the O-Yoroi, but it also would have been useful for the mission as a durable, fast gun platform with an Explosive CC weapon.
My other top choice for the mission was the Kuroshi Rider. Even faster than the O-Yoroi, with some smoke to help conceal her advance, she also conveniently packs D-Charges. I had recently rewatched Rob Shepherd’s video on Oban from the very start of N5, and was reminded of the Aragoto team with a duo of Aragoto or the Kuroshi Rider and a Rui Shi, which sounded appealing. I thought that might be a good option for a Haris that could fight its way to the objective and destroy it.
In my fiddling (and let’s be honest: waffling), I also found a Haris of a Domaru to start the team, Takeshi Oyama for bonuses and to get a DA CC Weapon up the field, and a Daiyokai HMG for a long-range gun that conveniently also packs an AP+DA CC weapon.
While it didn’t help me much in the last game of the league, I still really wanted to see what Mushashi could do. And the Tanko Disco Baller is also quite good, especially since PanOceania, even Military Orders, contains some Multispectral Visors. So that duo was high in my list of priorities to include. One thing to note about the pair is that while Mushashi’s CC weapon is capable of annihilating the AC2, being AP and Explosive with a PS of 4 backed up by Martial Arts L5, Mushashi is not actually CC 28 against it. Because the attack on the AC2 prohibits the application of any MODs. That was a sad thing to learn. But at least he still gets all of his dice, and his odds of one-shotting the thing are still pretty great.
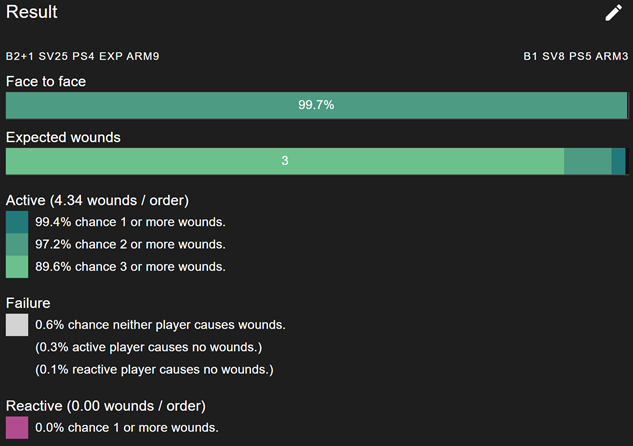
I didn’t put enough thought into how to get more D-Charges into the list, but one option I did consider and try to cram into the list was the Ryuken Unit-9 non-Rocket Launcher profiles, especially the Forward Deployment Killer Hacker. With the mimetism and decoy, it’s somewhat protected from gunfights, and it starts at nearly the halfway point. It is vulnerable to other hackers, though, by not starting in a true marker state. I did have a small fear of De Fersen, or even the Knight Of Justice hacker, who could both prove to be trouble for an isolated Killer Hacker on her own in the middle of the table.
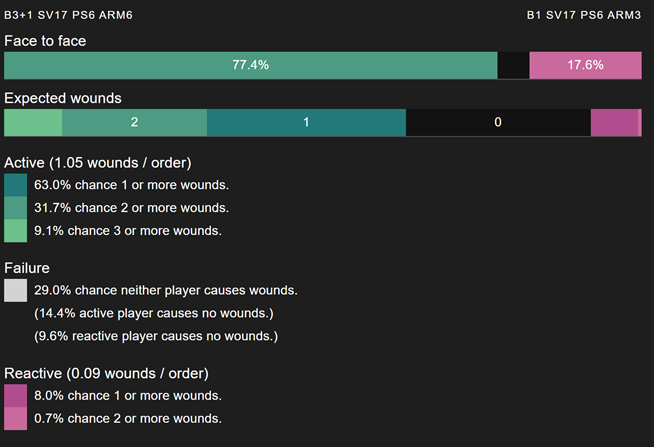
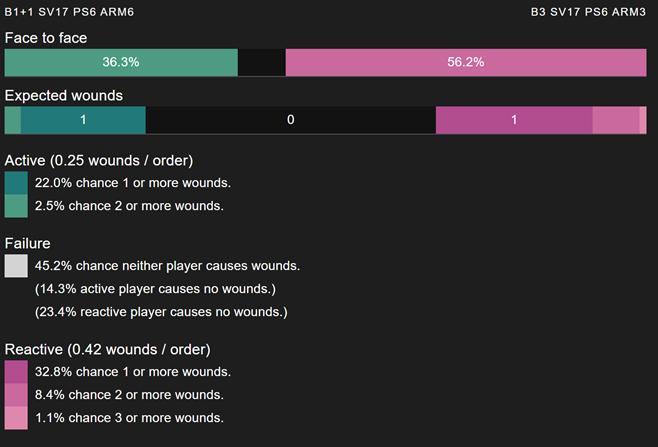
The numbers on the Knight Of Justice attempting to Oblivion the Ryuken are actually much more even than I thought. There’s still little chance of the Ryuken putting a wound on the Knight, much less two. And the consequences of failure for the Ryuken would be crippling. Just being Isolated would essentially eliminate her as a tool to finish the mission, unless she passed a Reset. That would be on a 5, so far from impossible, but in the time it takes to do that, the Knight could follow up with a Carbonite that would almost certainly succeed, and then she’s resetting on a 2 and even less likely to be able to get to the other AC2.
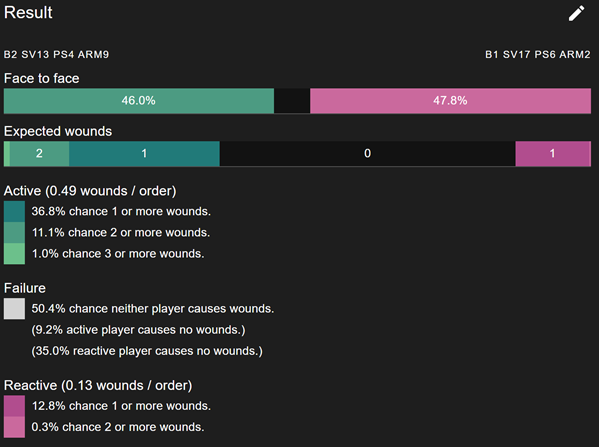
Other options for D-charges include the various dedicated Engineers (I definitely would have taken one if I had brought an O-Yoroi, but they’re all a little slow to follow up the samurai), the Taguraida TAG pilot (also would have taken if I were to bring the O-Yoroi), two of the Genbutai profiles (one the Engineer and the Specialist Operative profile, but I don’t own a Genbutai and as much as I would like to test it out, I’m still finding it challenging to fit a lone, one-wound, un-linkable operative into my lists), Samsa, and the Shikami.
I hadn’t been interested in trying Samsa until recently. I don’t think I even looked at his profile until after my game with Sean. Which is a shame, because looking at him now, I would have liked to have tried to stuff him into my list for this mission. Plasma is beautiful, and his mobility is wonderful, even if he is exceedingly fragile.
I might have liked to have had the MULTI Rifle Shikami. Pretty unparalleled mobility in the faction, a specialist, and if the D-Charges don’t do the job(s) somehow, the AP+DA CC Weapon will. But 47 points is a lot.
The List
Eventually I settled on this list for the mission.
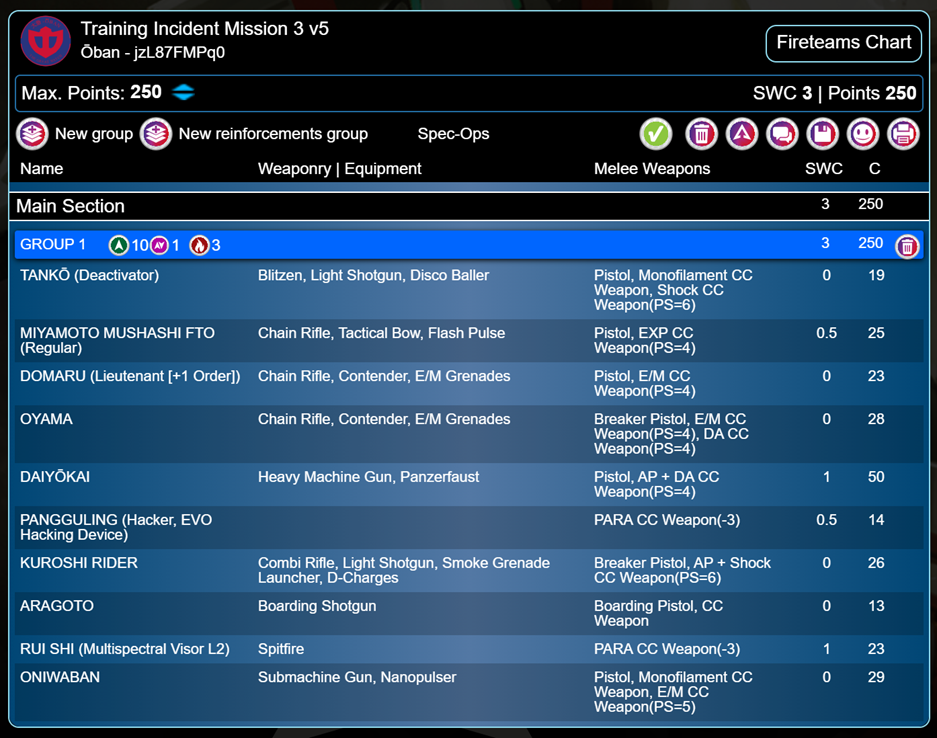
The goal is to give me a few options to deal with the AC2. The Kuroshi Rider can D-Charge it, or the Domaru and Tanko links can carve it up.
Depending on how I want to advance first, the Pangguling either puts Assisted Fire up on the Rui Shi to give it Marksmanship or puts up Fairy Dust to shield the samurai from enemy hackers. It’s not a great shield, but regularly playing Heavy Infantry has given me an appreciation for anything that can make an enemy hacker’s job harder. The choice of what to use the Pangguling for, at least what to use it for first, would depend on what Sean brought to the game.
And, of course, it provides Baggage to reload the Tanko and Daiyokai. Theoretically, it could also reload the Kuroshi Rider if she somehow uses all of her D-Charges and needs to come back for more.
The Daiyokai can provide supporting fire while it and the Domaru advance, and if that team runs into something it might have a hard time handling, either the Kuroshi Rider or the Tanko should be able to provide enough vision control to bypass it.
Or the Oniwaban might be able to handle it. There’s certainly a risk with the over-infiltration, but it’s really hard to argue with CC24, Martial Arts L4, E/M CC Weapons in your opponent’s back lines. And if one is feeling risk averse on that day, I don’t think it makes a bad thing to hide next to your own AC2 and surprise people that get to your AC2 but can’t quite kill it in their turn and have to hide near it.
In hindsight, the primary weakness of the list is that there is only a single source of D-Charges on the Kuroshi Rider.
The Game: Deployment
Sean won the roll off and immediately chose to go first, which makes sense. In hindsight, I don’t know that I chose the best DZ for myself, but I was a little concerned with space for the bikes to move. Below you can see our deployments up to our reserve models. Sean chose to spend a command token to hold back two models instead of just the one.
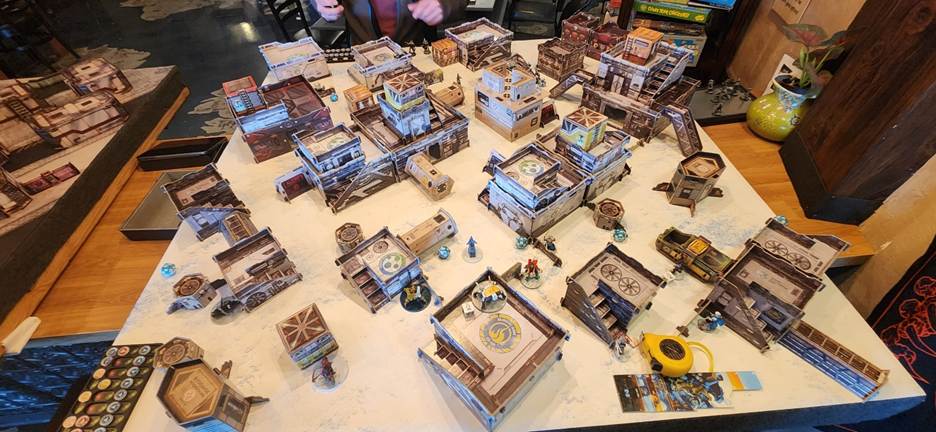
A Haris of Teutons took some cover near a building on my right that’s concealed by the large Akashi Site building in the middle. On top of the building the Teutons are using for cover, he deploys a Mulebot EVO hacker. A Sierra HMG Total Reaction bot sits on the roof of a building more to the left that overlooks most of the primary approaches to his AC2, while a Curator hides behind the ad sign just below it. And on the left side, there’s a Fugazi Flash Pulse bot helping watch over that approach to the AC2. I can’t remember if Sean had anything else on the table here, but that’s about all I can remember. With all but two of his models deployed, he hands it over to me.
And I proceed to be a bit of an idiot.
The Pangguling (played by a Fuzzbot because it’s a little lighter and more durable as long as I don’t drop it, and I’m not currently using any of my O-12 for anything) gets put on top of the central building. Everything else gets fussed with at least once before I finally make a decision on where it should live.
I end up with the Tanko duo off to the right, where I feel I’m more likely to have the best chances to advance and might therefore need vision control, though not anywhere close enough to reload the Tanko’s Disco Baller. Mushashi goes more towards the middle, where he can see the AC2 and get a decent line on anything coming from the left side with his Flash Pulse. The Samurai Trio goes behind them, with the Daiyokai intended to get a little better benefit from his range bands on anything coming down the center or to the right, even if he’s exposed on that flank. The Domaru went closest to the Daiyokai, and Oyama was hidden behind his own advertisement sign. I think I hid Oyama so thoroughly so that I could preserve his DA CC Weapon for the AC2, but he would have been a lot more helpful in a spot where he could take some shots with his Contender.
I honestly don’t even know if I fully considered the possibilities of that Teuton Haris with a Missile Launcher coming down that side. Or considered it at all, really, and that would turn into one of my most egregious miscalculations.
On the left side went the Aragoto Haris. The Rui Shi stood in the middle near the Fuzzbot to help watch over the AC2 (where its Spitfire would probably be in bad range most of the time, instead of, say, maybe putting the Boarding Shotgun Aragoto over there), the Aragoto went way off to the left to spread out the team a bit, and the Kuroshi Rider went behind a crate/noodle shop to hold the team together.
I had people watching most of the lines out of the DZ, expecting there to still be a Crusader Brethren in the wings, thinking that was MO’s only airborne troop.
I’ve even played Military Orders before.
Passing it back to Sean, he deployed his duo of Hospitaller Doctor and Knight of Justice Spitfire around and just in front of his Fugazi, which threatened my left side.
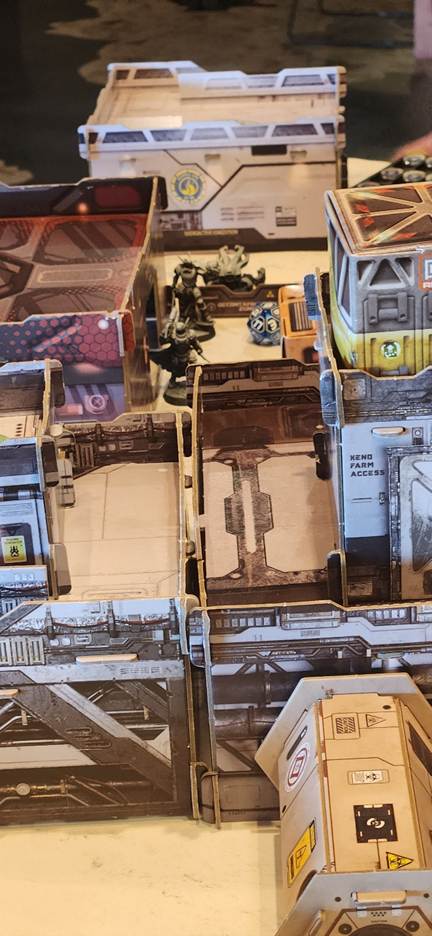
To try to help counter that, I tried to deploy my Oniwaban just outside of his DZ, below the Sierra TR bot and the Fugazi. I almost forgot to roll the Infiltration (and I think I did forget until we were significantly into Round 1), and when I did roll it, did not pass. So I just put him on the back corner of the largest building in my DZ. Definitely a handicap that took him out of the game pretty much entirely, but that felt deserved since I had forgotten the roll until the game was underway. Had I been more on the ball, I might have tried to put him on the left side, maybe near the Aragoto Boarding Shotgun and prone.
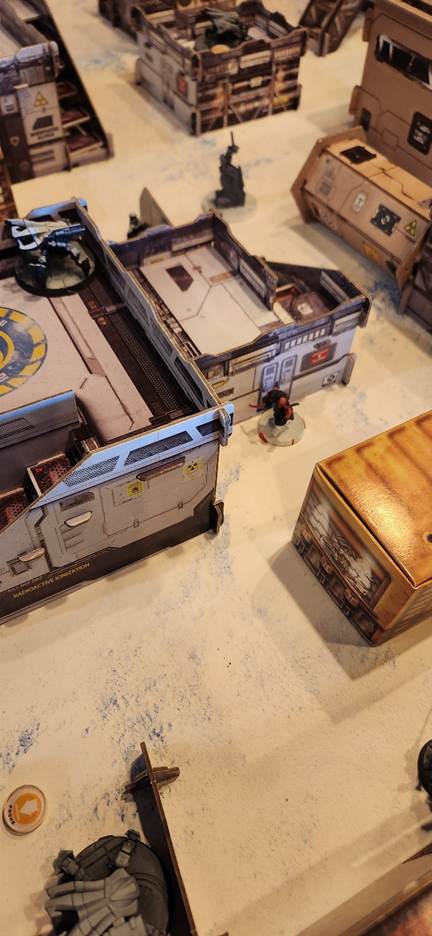
As we were about to get started, we did a quick check of the mission to make sure we hadn’t forgotten any of the setup, and realized we had indeed forgotten Sabotage. Though not strictly before deployment, we each chose our piece of scenery at the same time, so I think overall fairness was preserved.
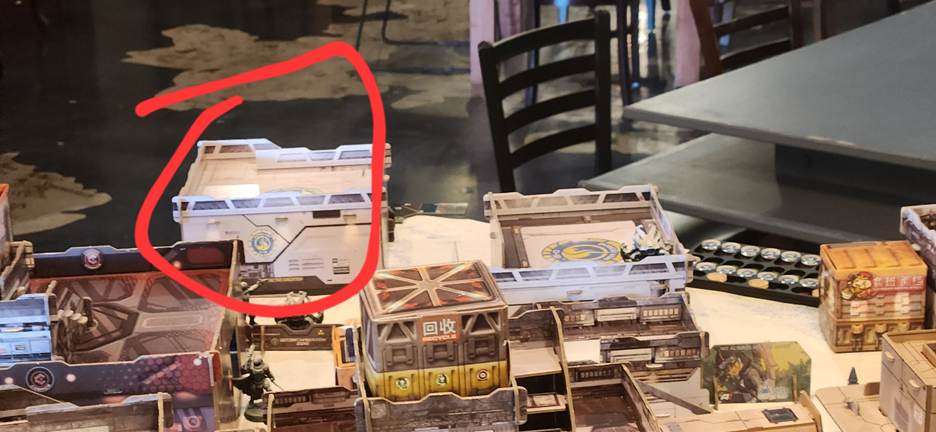
Sean doesn’t have enough orders on the table to strip, so I decide to do something new and put the Daiyokai into Suppression.
And with that, we were off.
The Game: Round 1
If I remember right, the Teutons do take advantage of their Impetuous orders to get that extra distance, since I don’t really have anything watching the first part of their advance. They run forward to the large building with the staircases on either side of it and in their next order or two, two of them rush up the stairs and onto the balcony so that they can overlook my DZ. The third stays on the ground and runs forward just enough to stay in the team.
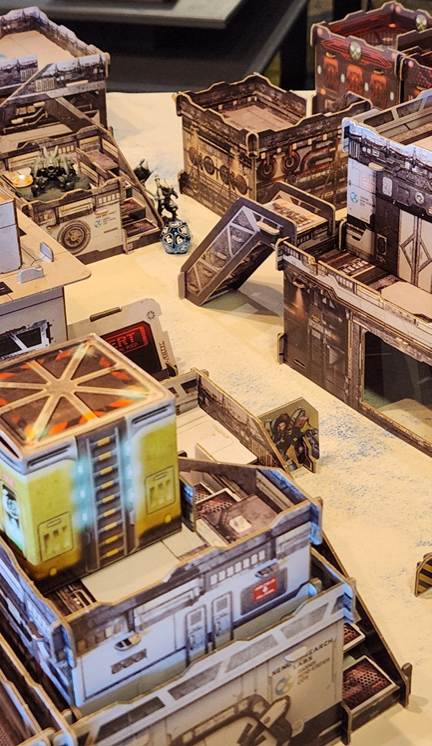
Once in position, the Missile Teuton takes a no-cover, blast-mode shot into the Daiyokai. The Daiyokai takes his shots back. While I definitely wanted to take advantage of the Suppressive fire this time, I’m pretty sure I forget the guy has Panzerfausts for the entire dang game, so his return fire is almost entirely HMG. Fortunately my dice help bail me out of this one. The Missile hits, the Daiyokai saves out, and once the template is laid down, Mushashi makes his out-of-line-of-sight dodge and ducks around the corner.
Putting him out of coherency with the Tanko.
The Daiyokai also chooses to fail guts, breaking suppression, and moves to touch the barricade that Mushashi leapt over while seeking to break line of sight.
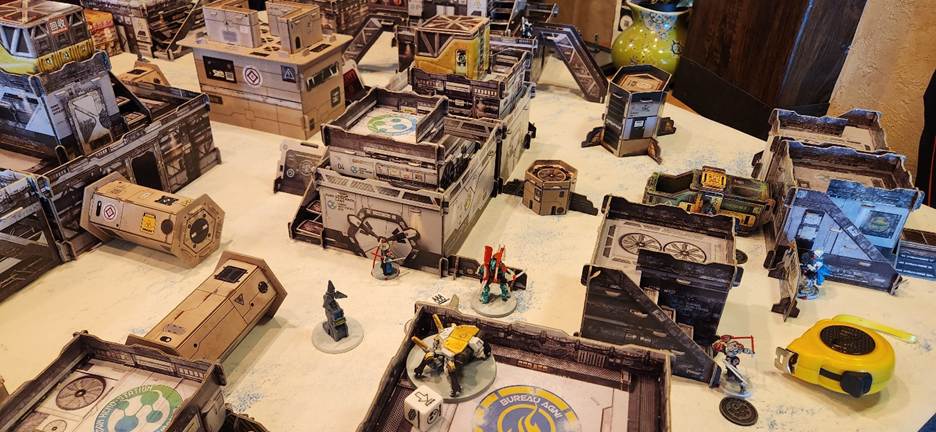
In hindsight, maybe I could have chosen to move Mushashi just to the other side of the barricade and remained there to provide flash pulses. Though he wouldn’t have been able to see the Teuton until it dealt with the Daiyokai and would have just been eating (more) missile templates. Better, probably, would have been to dodge him closer to the Tanko, up against that fan duct thing, to try to get sight of the Teuton at the same time as the Daiyokai so that Sean would have had to make a choice on who to attack. That probably would have been the play there.
I think there are a couple more shots exchanged between the two, and the Daiyokai ends up with a wound at some point.
Feeling like there’s little profit to be had there at this point, Sean spends an order on the Mulebot and puts up Controlled Jump. My immediate thought, if I remember right, is, “Weird choice to Combat Jump a Crusader Brethren, but I’m absolutely not going to make it any easier for you.” So I react with my own Controlled Jump to bring him back to flats.
He then walked over to my side of the table and placed a Knight of Santiago. And I want to slap myself.
He rolls the jump and the Santiago lands. Fortunately, the place he chose to land was within Zone of Control of my Aragoto and Kuroshi Rider, and I have the presence of mind to try to dodge with them. They both make their dodges and move away so that the Santiago can’t just walk around and shoot them in the back. Unfortunately, I move the Kuroshi Rider into the empty space behind her, rather than breaking line of sight or even getting her into cover. Or just moving her closer so that she can also shotgun the Santiago if he tries anything else.
The Santiago promptly tries something else, walking around that hexagonal Akashi Site building in the corner so that he can see the newly placed Aragoto on the other side of the building’s foot, and the Aragoto and Kuroshi rider both shoot him (the Santiago’s S2 silhouette is taller than the bikers’ S4, so the Kuroshi can see his head over her friend’s). I might deal the Santiago one wound, but the +1B Boarding Shotgun knocks out the Aragoto, and the Kuroshi Rider and the Rui Shi end up dead in the next exchange or two.
At this point, I think Sean is almost all out of orders, but the last things he does is moving the Santiago to the Aragoto’s original position and dropping the Curator’s Marksman Rifle Turret.
At this point, my first turn is a lot of flailing trying to stabilize and try to push out of my DZ.
One of my top priorities is dealing with the Santiago. My main samurai team is needed to deal with the Teutons so that I can get out of the corner they’re in. The other samurai team is already broken, so I feel I can send Mushashi to deal with the Santiago. After some LOS checks on the routes I would have to use, I find that I’d need to deal with the Teuton behind the Missile Launcher on that balcony for Mushashi to have a totally safe route of advance.
I think I try to drop Disco Balls right next to the Tanko so that maybe my Samurai can get closer, but the Tanko misses the first one. He does get it on the second order, which allows Oyama to extract himself from behind the ad sign and move closer so that activating the Daiyokai, newly added to the team with a Command Token, doesn’t immediately drop him out of it again.
Then the Daiyokai tries to put down the Missile Launcher.
This does not work. I might put a wound on the Teuton, but I can’t kill him, and I’m rapidly burning orders as Sean leans on Religious and just lets me beat my head against that particular wall.
With my order pool already low, I eventually decide to just risk it. After all, Mushashi has a high Physique for dodging, so I’ll probably be fine. It’s only in a couple places where the Panzerfaust Teuton can see me anyway.
Again, the dice bail me out here, even if I have to spend a stupid amount of time dodging around the building as the Santiago tries to escape.
He does catch up to him eventually, even if he takes a wound from me not being careful enough around the Panzerfaust, and turns him into a faint pink mist. Then he ducks away to hide prone behind the conduit barricade so that he can pop out and try to be a menace to the Knight of Justice and his friend once they come down the street.
Fair from the only thing I wanted to accomplish in my first turn, but it was an extremely satisfying conclusion.
The Game: Round 2
I completely forgot that most of the Knights have Stealth.
This turn, Sean primarily uses the Knight of Justice/Hospitaller team as his focus pieces. They come running down the street, far too late to save the Santiago, but by the time they start shooting, they’re already well past Mushashi.
Instead, they take their first shots into the Tanko that’s exposed to them, and the Tanko promptly falls over. Between them and that cursed Teuton Missile Launcher (possibly the Panzerfaust? Looking at the few pictures I remembered to get, there do appear to be some Speed Ball tokens, so maybe I did put down the Missile Launcher and then couldn’t get to the Panzerfaust to deal with it as well), the Daiyokai is killed, and then Sean puts down my Domaru as well. His last couple orders are spent doing some repositioning with the Teutons and doing the mission with the KOJ.
In a fit of spite, the first D-Charge on the AC2 actually doesn’t damage it at all, if I remember right. Also very satisfying for me. I think about that point, Sean moves his Hospitaller team back and into some cover.
Much less satisfying is still being in my DZ and now also being in Loss of Lieutenant. I drop my own speed balls to pick up what orders I can to try to defend my AC2. Oyama picks up the Domaru with his pair of orders, and then… I don’t get a whole lot done. I have about four order-generating models at this point, even if Oyama generates two. I move the Oniwaban up, though not enough to do anything effective. I stand Mushashi up, I think through a Dodge. And then I pass the turn.
The Game: Round 3
Sean brings his team back to the AC2, killing Mushashi, Oyama, and the Domaru in the process, then finishes off the AC2. The Teutons come down the stairs and stare down the Oniwaban, daring him to do something.
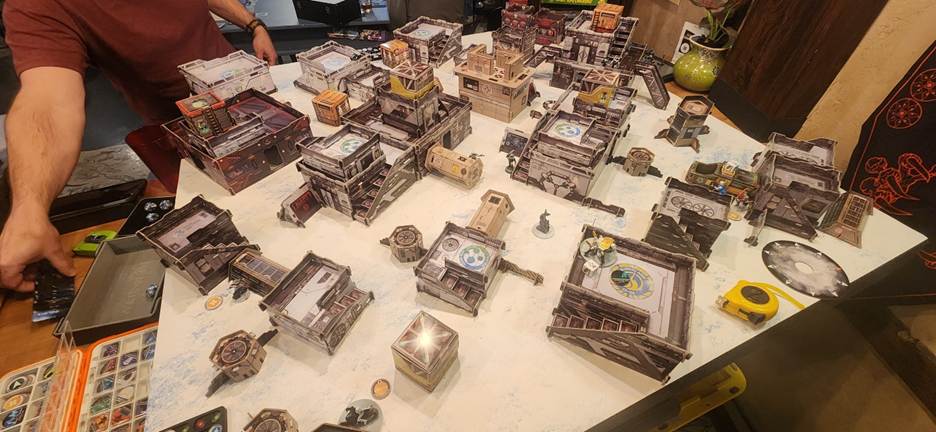
I’m pretty sure this wasn’t legal, since I was almost certainly in Retreat! at this point, but I move the Oniwaban forward and try to put a wound on a Teuton or two, but don’t manage anything since I wasn’t close enough to get into CC.
And that’s the game.
Post-game
I think I did myself a grave disservice with my deployment. It may be a case of “grass is greener on the other side,” but I do think I might have been better served on the other side of the table. All of the streets were perfectly capable of fitting the biker team through, with only a couple of obstacles they may have needed to squeeze through. Then there were the much better positions my units could have used to watch over the approaches to the AC2.
If I were to stay on the same side, I think it would have been better to have swapped the sides that I deployed things on. We could have engaged the Teutons much earlier with the Daiyokai had he been placed on the corner of one of the smaller buildings over there, like the one the Aragoto was hidden behind, and the Domaru/Oyama might have been able to chuck Contender rounds down the Hospitaller team’s path of advance.
However, I think the Daiyokai may have been best placed where the Rui Shi was, especially if I was going to keep him in Suppressive. I was very concerned with placing him on a rooftop, since he might have been a pain to get down. I may be overblowing that concern, though. He’s not terribly fast, but he could almost certainly get down some stairs, at least on the smaller buildings. And there’s always jumping.
Meanwhile, the Aragoto team could have been placed so that they could engage from their preferred ranges, likely in ambush as the Teutons came down that cluttered street on that right side. I still think they might have folded fast, and I still would have been out of luck on the Sabotage points. But at least the Domaru team would have had a better route to take.
I should have just left the Oniwaban next to the AC2 and not bothered trying to stuff him past the halfway line. In this mission, he can’t do anything to the enemy AC2, and he doesn’t have D-Charges of his own. So his only purpose would be assassinating the backline units. But I had already seen that Sean had about three of them. Both the Teuton team and the Hospitaller team would both be coming to me at some point, so I could have just had a hidden CC specialist by my AC2 to hunt anyone who got close to my AC2.
I think overall, I was really not prepared to defend in this mission, especially from someone running units just as fast and durable as mine. The Daiyokai was my only real gun, and I squandered him by not setting him up to take advantage of that. If I had been able to throw a couple 1+1 Panzerfausts at those Teutons relatively early, we might have been able to stop their advance cold.
And I can’t believe I completely forgot about the Santiago. The straight-up Combat Jump was a risk, but the effects were absolutely worth the risk. I was not prepared for that at all. I might well have had a better chance in the game had Sean failed the Jump, but if wishes were fishes and all that, and I should have anticipated the attempt.
As for units, I think I do, indeed, love the Daiyokai. That thing is tanky and has nearly as good a gun as my beloved Gamma.
I’d like to try Oyama some more. He’s pretty bog-standard for a Domaru, but that Tactical Awareness order and DA CC Weapon are both very nice upgrades. I’d like to Berserk a Domaru team (with or without Oyama, I suppose) at somebody at least once.
Mushashi is so cool. He’s a little tankier than some expect, and who doesn’t like positively vaporizing enemies with swords? I think he’s great to pair with a Tanko if you don’t want or need just a Tanko in your Domaru team.
Overall, I think I hamstrung myself in deployment, and couldn’t play well enough to get myself out of it, especially with how well Sean played his game. I think from his point of view, that was nearly textbook-perfect. Maybe he could have spread his Teutons out a bit more to make sure there was no way I could break out without copping at least one ARO, but his gameplay was very tight and well done. And he was a gentleman about the whole thing, commiserating when my dice failed to save me and making jokes with me, even if his prosecution of the game was merciless.
Outro
As usual, if you’ve read this far, thank you!
Standard shilling:
If you’ve found this helpful, entertaining, you can follow and/or subscribe here directly or on Patreon (some construction is ongoing there). I’ve also set up a Ko-fi if you prefer to support these rambles that way, or just want to throw a couple bucks my way if I stumble upon something profound. I’m also open to accepting suggestions for things to talk about in the future, and will (generally) prioritize the topics that come from subscribers.